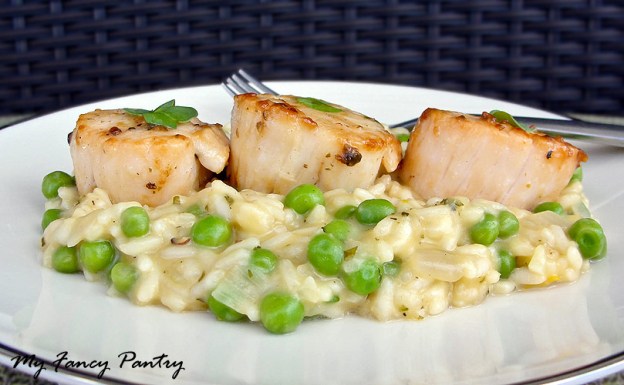
Pan Seared Scallops With Sweet Pea, Tarragon and Lemon Risotto
Sometimes figuring out what to make for dinner can be quite the challenge.
You see, I have this terrible problem of never knowing exactly what I want. Then, when I think I have it all figured out…BAM!…it changes, and doesn’t sound interesting anymore. (Haha! Kind of like my career-path, now that I think about it. I never could decide exactly what it was that I wanted to be…).
So today, like most days, I wandered off to the supermarket to buy ingredients for an Indian-inspired dish using scallops. Small problem. I didn’t really feel like eating Indian.
I wanted something flavorful, but not spicy. Something that was both hearty and filling. I wanted to eat out!
I knew Piyush would not be happy if I told him I wanted to go out tonight, especially because our refrigerator was well stocked and I had just spent a small fortune on fresh scallops. So I opened up the pantry doors and hoped for a little inspiration.
And then I saw it. A big jar of arborio rice, sitting right in front of me. I decided to try my hand at making risotto.

I’ve never attempted to make risotto before, and have actually only tried it once. I remembered it being a little crunchy and dry and I didn’t understand what all the fuss was about, really.
But now that the idea was in my head, I had to have risotto. And I had to have it now. That’s just how I am, I guess.
After searching online and getting a little inspiration from Gordon Ramsay, random youtube people and the lovely Angela @ Madame Croquette (truthfully it was probably reading her post on saffron risotto with tiger prawns that sparked tonight’s dinner), I got to work.
I found a recipe from Cooking Light that sounded like it would taste spectacular (It did!)–and I had all the ingredients on hand. From start to finish, making the risotto took about a half hour–with at least 25 of those minutes spent stirring the rice. It was tedious, but zen-like at the same time. I liked it.
Unfortunately I didn’t take any photos of the risotto making process. It really is a process, and I was too involved with stirring (and day-dreaming) to even think about clicking photos. Sorry!
I’ll pass on a little risotto-makin’ knowledge though…
First, make sure you have all your stuff ready. Usually I run around like a crazy person, digging through cupboards and raiding the refrigerator; but this time I had everything pre-chopped and pre-measured. I think this was the biggest contributor to my risotto success!
Second, make sure to taste your rice as you cook. Each time I tossed in a ladle of stock, I tried a grain or two of the rice. You don’t want it to be crunchy, but it shouldn’t be mushy either. Aim for your rice to be cooked al dente. A little “bite” is a good thing!

Once the risotto was finished, I set it aside and got started on the scallops. I learned to cook scallops last year, and I’ve got to tell you…it’s simple! They look intimidating…but looks are deceiving! I really have no idea how all those cooks on the “reality” cooking shows can screw them up. Honestly. It’s crazy.
One thing I love about scallops is that they cook really, really fast–which make them an ideal match for risotto (you don’t want the risotto to go cold). On the other hand, one thing I hate about scallops is that they stink up your house. Completely.

Brown Butter Pan Seared Scallops–garnished with a little radish sprout
To cook the scallops I used a non-stick pan. I usually always use my cast iron pan, but I was feeling lazy and I didn’t want to have to scrub it out when I was done. The non-stick pan gave a nice sear, but I really think I get a much better color on the scallops when I use the cast iron pan.
You win some. You lose some.
I tossed a tablespoon–or so–of olive oil in the pan and waited for it to get hot. Real hot. That’s important. Then, I placed the scallops–which I generously seasoned with salt and pepper– in the pan and let them cook for a minute or so before flipping. After flipping, I let them cook for another 30 seconds before tossing in a “butter bomb.”
The butter bomb is simply a pat of butter (about 1 1/2 tbsp–give or take) with fresh herbs stuck into it. I toss it right in and let the butter brown up. It adds a delicious nutty flavor to the scallops.
After the scallops get “bombed,” they really only take about a minute longer to fully cook through. Watch them closely, scallops are very easy to overcook; and nobody likes rubbery scallops! It’s much better to have them slightly underdone.

This dinner was fantastic! I think risotto might be my new favorite thing. Seriously.
It’s weird, but for some reason it really reminded me of macaroni and cheese. It must have been the creaminess or how comforting the dish is, I don’t know. It didn’t taste like macaroni and cheese…
I’m so excited to try other variations. In fact, I was thinking I’d find a way to “Indianize” it…
Until then, I’ll leave you with this recipe!
Makes approximately 8 servings — 1/2 c. each (each serving is around 210 calories)
Recipe adapted and modified from Cooking Light
Ingredients for Risotto:
- 1 c. fresh or frozen sweet peas (If using fresh, be sure to blanch them. If using frozen, simply let thaw)
- 4 to 5 c. Vegetable Stock (I used 2 c. homemade chicken stock and 3 c. store bought veggie stock)
- 2 tablespoons extra-virgin olive oil
- 2 large garlic cloves- minced
- 3 shallots- chopped
- 1 c. uncooked Arborio rice
- 3 tbsp. dry white wine (I used a dry marsala)
- 1/2 c. fresh Parmesan cheese- grated
- zest and juice of 1 small lemon (I used a meyer lemon)
- salt- to taste
- freshly ground black pepper- to taste
- 1 1/2 tbsp. chopped fresh tarragon
- 1/2 tbsp. chopped fresh thyme
- 1 tablespoon mascarpone cheese (may substitute butter)
Directions for Risotto:
- Bring Stock to a simmer in a small saucepan (do not boil). Keep warm over low heat.
- Pour 2 tbsp. olive oil into a heavy bottomed pan (I used my dutch oven) and heat over medium-high flame. Once the oil is hot, add the shallot and garlic–stirring constantly. You don’t want the shallot to take on a brown color, but you want it to be cooked through and semi-translucent –approximately 3 to 4 minutes.
- Once the shallot and garlic are cooked, add the chopped tarragon and thyme. Stir to combine.
- Add the uncooked rice to the pot and cook (stirring constantly) for about a minute. Add 3 tbsp. wine to deglaze. Keep stirring the rice until all the wine seems to be absorbed and the pan is looking dry.
- Add one ladle of stock (approximately 1/2 c.) and stir until nearly all of it is absorbed by the rice. Keep stirring and adding stock 1/2 c. at a time as the rice absorbs it. I ended up using about 5 cups of stock, but it will really depend on how long your rice takes to cook (you want the rice to be al dente –it should have a little bite to it) and how creamy you like your risotto. This process will take anywhere from 20 to 30 minutes.
- Stir in peas and cook the risotto for about 1 minute before adding the cheese, lemon zest, lemon juice, salt, and pepper. Keep cooking and stirring until the cheese is melted and is no longer “stringy.” The risotto should have a nice thick, creamy consistency at this point. Remove from heat. Stir in the 1 tbsp. mascarpone cheese to finish.
- Serve as soon as possible for best flavor.
Ingredients for Scallops:
(increase as needed for more servings. This will make 2 servings of 3 scallops each)
- 6 wild caught sea scallops (dry packed)
- 1/2 tbsp. olive oil
- 1 tbsp. butter
- 3 sprigs of thyme
- 1 large sprig of fresh tarragon
- salt- to season
- pepper- to season
Directions for Scallops:
- Dry scallops with a paper towel and set aside on a plate. Season the scallops with salt and pepper. Don’t be shy with the seasoning, most of it will get lost in the pan and won’t stick to the scallop.
- Heat 1/2 tbsp. olive oil in a medium sized non-stick pan. Once the oil is hot add the scallops one at a time in a circular position. (Imagine a clock. You’ll want to place the scallops at approximately 12:00, 2:00, 4:00, 6:00, 8:00 and 10:00–this will ensure the scallops cook evenly).
- Scallops cook quickly. Sear the first side for about a minute. When you notice some nice color, flip the scallops. Cook for 30 seconds and then add the butter and fresh herbs to the center of the pan. Let the butter cook for about a minute.
- You’ll notice the butter will begin to brown and smell a little nutty. Spoon the butter over each of the scallops, and cook for about 30 seconds more.
- Remove the scallops from the pan and place them on a plate with paper towels. You can drizzle the left over browned butter over the scallops if you’d like.
- Serve immediately on top of the risotto.
|

Printer Friendly Version