Chicken Tikka Masala Pizza!

One night while Piyush and I were touring around India, we decided not to go out for dinner. We were so tired, we turned on the tv and ordered room service. Because we were staying at a pretty expensive hotel…the food was also expensive.

Piyush couldn’t stand the idea that we were going to pay 3 times the amount for a meal that would cost us only a few rupees a couple blocks away. I understood what he was saying, but I didn’t want to leave the hotel again–and be forced to cross the road.

You see, crossing roads in India is scary!  There aren’t any cross-walks, and traffic doesn’t stop.  Piyush could easily handle it, but it made me crazy!  So crazy, in fact,  that I possibly had a mini tantrum, acted like I was 7 years old, and convinced Piyush to order room-service.  Possibly.

Watch this video, you’ll see.  It gives me a panic attack just seeing it!

To make up for my childish behavior, I told Piyush we could order the cheapest thing on the menu.  Imagine my excitement when that turned out to be pizza!

I mean, I love pizza.  I love curry.  What could be better than eating them both at the same time (haha I’m such a glutton!)?

Piyush didn’t want pizza and didn’t think it would taste any good, but I couldn’t resist: Chicken Tikka Masala Pizza.  It sounded amazing!  …And it was!  After eating a few slices, even Piyush said it was genius!

Unfortunately, I have not been able to find anything remotely close to that delicious pizza here in the United States.  Sure, you can order a chicken curry pizza once in awhile—but I haven’t tasted one I liked.

Since I made chicken tikka masala a few days ago, I decided to use the left-overs and attempt to replicate the pizza I had in India.  …and let me tell you, it was a success!

Just seeing pictures of it make my mouth water!  This pizza was incredible!!!  I wish there was some contest or something I could enter it into, cuz I’m tellin’ you…It would win!

This pizza could also be made vegetarian—simply do not include the chicken.  A paneer tikka masala pizza would be equally amazing!

Chicken Tikka Masala Pizza on Coriander-Garlic Whole Wheat Crust

Continue reading

Chicken Tikka Masala!

If you haven’t already entered, and would like to try some Darjeeling loose leaf tea I brought back from India…be sure to enter the giveaway HERE.  It ends Friday, April 6 at 7pm Central time!  

If you love Indian food, chances are that you adore Chicken Tikka Masala.  Maybe you even crave it?!  I can even get my younger cousins–who are scared to try anything new–to eat chicken tikka masala…it is that good!

It’s a flavorful Indian curry which is equally fattening as it is tasty.  This is not a curry I would make often, and if I did…I definitely would lighten it up.  Instead, this recipe is very, very similar to what you would receive at your favorite Indian restaurant.  I’m so confident, I would even say it may be better! Continue reading

Indian-Style Tea –and a Nathmulls Darjeeling Tea Giveaway!

I remember the first time I had a sip of tea. I was about 7 years old and in second grade. My best friend at the time, Anita, was spending the night and we decided to have a tea party. We raided my mom’s cupboards and found some old (antique) cups and saucers. We also managed to find a few tea bags. I didn’t know how to make tea– my parents never drank it– but we figured it couldn’t be that hard.

Anita turned on the faucet and filled the cups with hot water while I cut open the tea bags. We dumped the tea-dust into the cups of water and put them in the microwave for 5 minutes. While the tea was heating, Anita and I made a couple sandwiches–peanut butter and jelly; I believe. I remember being so excited to sit down, clink our cups together (cheers!) and drink tea. I felt like a grown up.

When our tea was finished in the microwave, we carefully took the very hot cups and placed them onto the saucers. We sat down at the table, giggling, and waited patiently for the tea to cool off enough to drink it. Once it was ready, we clinked the cups together (bad idea!…tea spilled everywhere) and took a sip.

As soon as the tea met my taste-buds, I knew tea was not for me. It was gritty and gross; and the look on Anita’s face showed me that she felt the same. We promptly dumped the tea down the sink, rinsed out our cups, and cracked open an orange Crush soda.

20 years have passed since my first experience with tea, and I’m glad to say it wasn’t my last. Now I enjoy many types of tea; sweetened and unsweetened, loose-leaf and bagged, Darjeeling and green.  Although I’ll drink nearly any kind now-days, I undoubtedly prefer the sweet– and sometimes spicy– Indian style tea.

This delicious beverage, commonly known as chai (in Hindi) or cha (in Bengali), is not the same “chai” you get if you order it at an American coffee shop (I’m lookin’ at you Starbucks!).  In America, Indian masala chai (mixed-spice tea) has become synonymous with the word chai; but chai is just a word for tea.  It’s not a type of tea…and it definitely does not come from artificial syrup (did you know that tea leaves are not even a listed ingredient on some of the syrups your favorite coffee shop uses to make your chai?).

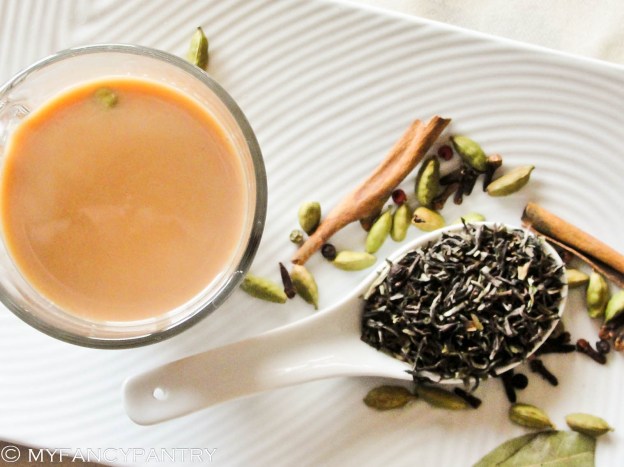
In India, chai is most often made with black tea leaves, way too much sugar, thick, whole milk…and green cracked cardamom pods—if you’re lucky!

sweet, green cardamom pods

It can be found everywhere…and I do mean everywhere!  You can buy it for a couple rupees at the train station, served in tiny paper cups;  or along the roadsides, where scant amounts are poured into tiny earthenware vessels; and if you’re lucky enough to be invited into an Indian home, you’re sure to be offered a steaming glass of creamy chai…with biscuits to dunk!

My mother and father-in-law (Maa and Baba), taught me how to make proper Indian-style tea…and for that, I am thankful!  When preparing tea, they never really used exact measurements.  Instead, they relied on color and taste.  It took me awhile, but I think I’ve finally got it figured out (Baba, if you’re reading this…you’d be proud)!

Not only do I intend to share with you, dear reader, how to make Indian-style chai (and masala chai!), but I would also like to give you a chance to try some Darjeeling loose-leaf tea that I bought in Darjeeling, myself!  This is not the Darjeeling tea you find lining your supermarket or co-op shelves…nooo…this is the real deal!

Darjeeling Loose Leaf Tea...and a strainer! The tea was purchased at Nathmulls in Darjeeling. If you want to learn more about it click here.

If you’d like a chance at trying some Darjeeling tea for yourself, here’s your chance!  I’m having a  giveaway, and one lucky reader will receive the package of tea and tea strainer shown above!

To enter, simply leave a comment telling me how you like to drink your tea!  It’s that easy!

The giveaway ends Friday, April 6 at 7:00 p.m. Central Time.  The giveaway is only open to U.S. residents aged 18+ (sorry!).  Be sure to include a valid email address with your comment…if you win, I want you to know!  I’ll choose the winner randomly using Random.org’s random number generator.  If I don’t hear back from the winner by Monday, April 9 at 5:00 pm Central Time, a new winner will be chosen!

For an additional chance to win: Follow my blog or sign up for email updates.  Be sure to leave a comment letting me know if you did this!

If you already follow or subscribe, I appreciate it and you deserve an extra chance too!  Leave a comment letting me know!

My blog is pretty young yet…so the chances are good!

**The giveaway is now over!  Congrats, Mary Ella!  I hope you enjoy the tea!**

Now, on to the recipes!

Indian-Style Tea (with milk and sugar)

This can also be made using stevia, if you’re concerned about your sugar-intake.  I also make it with soymilk.  If you choose to do this be sure to add the soymilk at the end.  Don’t boil it, it will curdle!

This recipe yeilds 3- 80z. servings.

  • 2 c. water
  • 1 tbsp. loose leaf tea
  • 3 green cardamom pods, cracked (optional)
  • sugar, to taste (if you want the whole “Indian experience” toss in about 3 tbsp–seriously.)
  • 3/4 c. milk (whole milk, if you want to keep it real)

Directions: 

  • Heat 2 c. water in a small pot over med-high heat until it’s rapidly boiling.  Once it’s boiling, toss in the tea leaves (and a couple cardamom pods, if you want), cover the pot, and turn off the heat.  Let the tea steep for about 5 minutes.
  • Add sugar–to taste –and milk.  Stir to combine everything.  Turn heat back on and bring the tea back to a boil.  Once it boils…it’s done!  Don’t cook it for too long or it’ll turn a little bitter and taste funny.  Turn off the heat, strain, and enjoy!

Masala Chai

To make masala chai–  follow the same recipe and method as above, but also add:

  • small chunk of ginger, smashed (use as much as you would like, but remember…it’s strong!)
  • 1 bay leaf
  • 4 green cardamom pods, crushed
  • small sliver of cinnamon
  • 4 peppercorns
  • 3 cloves

Add these spices, whole, to the water when you add the tea leaves.  Experiment with the quantities of spices and find the mix that is just right for you!  …Everyone’s tastes are different!

If you want to make the chai really special for someone, add a whole cardamom seed to the bottom before straining the tea into the glass!  If you could say, “I love you” using spices…this is how you’d do it!

A spice-y surprise!

Enjoy!

Chicken Jalfrezi

Chicken Jalfrezi

It’s no secret that I love Indian style curries.  They’re delicious, spicy, and usually pretty healthy (assuming you are making them yourself!).  Yesterday, I shared my recipe for a good gravy base that will have you turning out curry after curry in no time.  Today, I’m going to show you how to use that base to make a dish that will blow your mind! Continue reading

Curry in a Hurry! Simple Curry Base Recipe

Do you love Indian style curries, but don’t make them at home because you think they take too much time?  Or effort?  Or skill?  Do you make curries at home, only to find that they’re nothing like the ones you order at your favorite restaurant? I’m going to let you in on a little secret…something I do, sometimes, to help save time.  Ready?  Here it goes:

It doesn’t look like much, I know.  And, most traditional Indian cooks would not make so much gravy at one time…or freeze it.  In fact, In India they don’t freeze much of anything (in my experience).  But, luckily for you…and me…I’m not a traditional Indian cook. Continue reading

Shrimp Fajitas (without the funky chemical “spices”)

Have you ever went to the grocery store with the intention of making either fajitas or tacos that night for dinner?  Did you pick up some amazingly fresh produce, buy some lovely seafood (or equally expensive chicken breasts), and then throw one of those packaged fajita/taco seasoning pouches in your cart?  I have.  Many times.

I’d go home, cook everything up, add the spice mix (following the directions on the back), take a bite, and immediately wish I would’ve went to Chipotle instead.  There’s just always something so funky tasting about those little spice packets, and no wonder!  Look at the ingredients:

Image

I’m pretty sure Mexican’s don’t use soy sauce to make fajitas.  Or caramel coloring.  Or natural flavors.  What the heck are natural flavors anyway?  Shouldn’t the natural flavors come from the vegetables and the proteins? Where are the spices? After reading the back of that package, there was no way I was going to use that to make our dinner. A little salt, pepper, lime juice, cumin and chipotle would do the trick.  I decided to use chipotle chile powder because it has a nice smokey flavor to it, and it’s not an artificial smokey flavor either.  Chipotle chile powder is made from ground up smoked jalapenos.  It’s not super spicy, but gives the dish the flavor and the kick that would be expected if you ordered fajitas in a restaurant.

Image

I loved the texture on my lime…it looks like it has goosebumps!

I had bought a few green and red bell peppers last week, and they were starting to get a little wrinkly—the red peppers were 88 cents/each…which is a steal in our area.  Here, in Rochester, red bell peppers are usually nearly $3 a piece!  Isn’t that insane?  One red pepper costs more than a whole pineapple!  I’m glad summer is almost here so I can grow my own!!!

I didn’t have any shrimp at home, so unfortunately I had to make a trip to the grocery store.  I bought a little less than a pound of medium wild US caught shrimp, an onion, and a new head of garlic.  When I got home I threw the shrimp in a marinade, cut up all my veggies, and got to cookin’.

Image

Cooking the shrimp—marinade and all!

One thing I really love about fajitas is that you can make them ahead of time and just reheat when you’re ready to eat them.  Piyush decided that he had to go golfing today, so I had no idea what time he’d be back for dinner.  Once he got home (at 7:15pm), dinner could be on the table in 5 minutes.

Image

Two, Perfect Shrimp Fajitas

These fajitas were absolutely amazing, and ditching the pre-made spice mix made all the difference, I’m positive of it!  I would even go so far as to say that my version of the shrimp fajita could rival that of any restaurant!  Yes.  They were that good.

Image

Shrimp Fajita mixture

I served the fajita mixture on high fiber tortillas (50 calories/ea) that I had spread about a tablespoon of refried beans onto.  I topped them with some romaine and greek yogurt.  There were some beautiful tomatoes too, but I forgot all about them until after we finished eating.  Dohhh!

My shrimp fajitas recipe makes quite a lot.  This is a really light supper, and each fajita is only around 160 calories.  How exciting is that?!  I had two, Piyush had three, and there is more than enough left for dinner tomorrow.   I work really early tomorrow and the following day, so not having to worry about making dinner will be a good thing.  That means I can (hopefully) go to bed earlier!  I might even make it to the gym!

Image

Next time you make fajitas at home, I hope you are inspired to ditch the chemical packets and try your hand at making them “from scratch.”  I swear it’s easy…and it’s way more healthy for you than adding a package of powder created in some lab!

Shrimp Marinade:

  • 1 lb fresh medium sized, wild caught shrimps (not previously cooked)
  • 1 large shallot, finely diced
  • 2 cloves garlic, smashed and minced
  • juice of half a lime
  • zest of half a lime
  • 1/2 tsp salt
  • pepper
  • 1 tsp. ground cumin powder
  • 1 tsp. ground chipotle chile powder
  • 2 tbsp. minced cilantro
  • 1 tbsp. olive oil

Rinse and dry shrimp.  Put them in a large ziploc bag along with the other marinade ingredients.  Toss everything together until the shrimp are all evenly coated.  Let the shrimp mingle with the marinade for around 30 minutes—while you are cooking the veggies.  

Veggies:

  • 2 large red bell peppers, cut into strips
  • 2 large green bell peppers, cut into strips
  • 1 large white onion, cut into strips
  • 8 oz. baby bella mushrooms, sliced
  • 2 cloves garlic, smashed and minced
  • 1/2 tbsp. olive oil
  • salt and pepper, to taste

Heat the olive oil in a large pan.  Once it is hot add in the onions. Cook the onions over med-high heat until they are nice and browned.  This will take around 10 min or so.  Once the onions are browned, add in the garlic.  Cook for about two minutes and then add the peppers.  Stirring occasionally, cook the peppers until they are tender but still have a little bite to them.  Add the mushrooms and cover the pan, they’ll take about 5 minutes to cook.  Season the veggies with salt and pepper.  Remove the veggies from the pan and set them aside.

In the same pan you cooked the vegetables, add a little olive oil (I used my misto).  Dump the shrimp in the pan along with the marinade.  Stir everything together and then put the lid on the pan.  After a minute give everything another good stir and flip the shrimp.  Once the shrimp have cooked for around 4-5 minutes (once the shrimp are fully cooked), add the veggies back into the pan and stir everything together.  Let the mixture cook together for about 5 minutes, with the lid on.  Take the lid off, scoop the mixture into tortillas, and enjoy!!!

Your mouth will thank you!  Mine did.  🙂

Easy Aloo Tikki (Potato Patty)

I thought today was a good day to prepare and freeze some Momos.  Piyush and I are planning on visiting my family this weekend, and I wanted to take some easy—and healthy—food along.  My family lives in a tiny town where there really aren’t many options for food.  There are even less options for good food (unless mom is cookin’ something up).  Piyush is going to be writing some software for my dad to use in his business—and plans to have it completed by Sunday, so he won’t really have a lot of time to devote to eating.  I’m not sure if my family of (very) picky eaters will jump at the chance to try my steamed momos, but it’s worth a try.

I made the momos a little smaller this time, and ended up with a lot of leftover dough.  I think next time I make them I will make double the filling and keep the amount of dough the same.  (If you’re wondering what the heck a momo is, check out this post.  It will enlighten you.  I promise).

While making the filling for the momos I ended up with about a half cup of extra mashed potato.  I decided I was going to make Piyush a special snack to eat when he came home from the office.  The momos are an amazing treat by themselves, but those are for the weekend.  Instead, I decided to make Piyush something I know he loves….Aloo Tikki!

Aloo Tikki

“Aloo” means potato and “Tikki” means a small cutlet, patty or croquette.  Aloo Tikki is basically just a patty made out of mashed potatoes and spices.  It’s so easy to make, and so tasty.  There are about a million recipes for this delicious little snack.  Some recipes I read called for the use of a pressure cooker and some involved incredible amounts of prep time.  I, personally, believe that something so simple should also be simple to prepare.

Because I was making the momos, I had the mashed potatoes made.  I also had grated some carrots, diced some onions, and crushed some ginger.  All I had to do was mix everything together…toss in some spices…and fry ’em up in a pan.  I can’t say there is really a recipe—with an exact ratio of ingredients.  Instead it’s kind of like…a little of this, and a little of that all tossed together and the results are a delicious party in your mouth.

I think the key to making a good aloo tikki is simply just tasting as you go.  You could really throw anything in these patties:  peas, cauliflower, fresh chiles…whatever you have!  As for the potato, you’ll want to have enough to bind everything together.  I also throw in a little bit of panko bread crumbs for some extra binding power.  I hate it when the tikkis break apart when you’re cooking them!

As for the spices…salt, pepper, garam masala, coriander leaves (cilantro) and chile powder are all that I used.  You could substitute panch phoron (Bengali 5-spice mix) for the garam masala…and that would be awesome!  Just make sure to taste everything as you go along.

After you have everything mixed together really well, roll the mixture into balls—a little over a tablespoon will do.  Then, roll the balls in flour (not too much), flatten into patties and heat up your oil!  I don’t use much oil at all, just a little bit to coat the bottom of the pan (don’t use a non-stick pan!).  Once the oil is heated, put the tikkis in the pan and let them cook until both sides are nicely browned.  Serve the delicious aloo tikkis with both tamarind chutney and green (coriander/mint) chutney.

Yum!

Dinner tonight will also be quite simple.  Leftovers!

Dal Makhani

Dal Makhani ---Lentils in a creamy tomato gravy. I use 1/4 c. half and half and 2 cups of yogurt to replicate what you'd typically get at an Indian restaurant. To help achieve that creamy look I blend everything together before I add the main ingredient (lentils) ...This is before the cooking.

Dal Makhani

Delicious! After 4 hours of cooking... This is not a quick and easy dish to make.

Yesterday was Holi, the Hindu holiday also known as the Festival of Colors, so I made Piyush a few different curries.  I made Dal Makhani (or at least my version of it).  I’ll post this recipe sometime soon…it’s long and kind of complicated, although it really shouldn’t be!  It involved a lot of spices:

This wasn't even close to all the spices I used...this was only for one part of the gravy.

This dish took over 5 hours from start to finish, actually.  Not all of the time was active cooking—but still.  It took a long time!

I have also been craving more vegetables lately, meat just hasn’t sounded appetizing.  Therefore I also made a curry that was a cross between Butter Paneer and Muttar Paneer.   I made a really easy gravy (curry) and added in some mushrooms, peas and paneer.

Paneer is a fresh, Indian cheese made with milk.  It reminds me a lot of tofu.  You could use tofu in place of paneer, if you’d like.  The dish will have pretty much the same flavor.  Before I add paneer to a dish I fry it up in about 2 tsp. of oil and a tsp. of garam masala.

cooking paneer

I just think it tastes better that way.

Have a happy weekend, everyone!!!!