Tag Archives: Pizza

Fig, Prosciutto, and Caramelized Onion Pizza with Pistachios, Chevre, and Honey

This weekend was a whirlwind of events; and I’m glad it’s over.

My gorgeous niece, Madelyn, was very sick and was admitted into the hospital.

She was full of bruises and her blood counts were not normal.  It was incredibly scary, but hopefully everything is figured out now (fingers crossed!).  Her counts are still not normal, but they are improving; and that is a good sign.

Because I spent my days worrying and my evenings working, I didn’t have time to post this incredible pizza I made last week.

Fig, Prosciutto and Caramelized Onion Pizza with Pistachios, Chevre and Honey

It was a pure pizza masterpiece.  

Fresh figs are one of my favorite things.  Unfortunately, it’s hard to find really good ones here in Minnesota.  Because figs are so delicate, they don’t ship well.  They started showing up at Trader Joes a few weeks ago–and you better believe I did a little happy dance!

But sadly, they weren’t good.

I was lucky enough to find a few cartons of them at my local co-op, and they were just right (the price was also significantly higher–unfortunately).

Fresh Figs: Black Mission. This little guy isn’t quite ripe, but it sure is pretty!

I sliced about 1/2 lb of figs along with some prosciutto (a very salty and thin sliced ham) and set them aside to top my pizza.  I also crumbled a couple ounces of chevre (goat cheese.  I used Trader Joes Honey Chevre) and chopped up some pistachios.

Prosciutto, Figs and a log of Chevre

If you love baking or cooking with pistachios, here’s a little tip I’ve learned:

To make it easier to shell and remove that paper-like skin over the pistachio, keep your pistachios in the freezer.  It seriously makes using pistachios a lot easier and takes a lot less time.  

I used my go-to whole wheat pizza crust recipe.  It never fails me.  You can get the recipe by clicking on the printer icon below.

While the dough was resting, I caramelized some onions with some fresh thyme (leaves off a few sprigs).

I used some onions that I had left over from another recipe, so It was probably 1/2 of a large onion.  I would definitely use 1 large whole onion, or maybe even 2 next time.  The pizza was amazing, but more caramelized onions would have made it even better.

Caramelized onions with fig preserves

Once the onions were caramelized, I tossed in about 2 tbsp. of fig preserves and let it all melt together.

I thought that by adding the fig preserves to the onions instead of just spreading them out on the pizza I would get better flavor, and it might help keep the pizza from becoming too sweet.

I was right.

After my crust had been precooked for about 5 minutes (I always precook my crusts), I spread the caramelized onion mixture on top of it.

You can see it needs more onions

Then, I topped the onion mixture with the prosciutto, sliced figs and chevre.

Unbaked Pizza

I baked the pizza on a stone for about 10 minutes in a preheated 450 degree F oven.

One the pizza was done baking, i tossed on a bunch of chopped pistachios (they were previously salted and roasted) and drizzled a bunch of pistachio honey over the entire thing.

The saltiness of both the prosciutto and the pistachios really helped even out the sweetness of the figs and the onions.

The chevre added an invaluable tang.

Piyush and I enjoyed our pizza while we watched the American women win Olympic GOLD in gymnastics!  So exciting!

All Sliced Up!

Now, here’s to hoping this week is less stressful…

…and if you liked this pizza, you may also like my Caramelized Onion, Purple Potato and Pistachio Pizza!!!

  Check it out here!

Advertisement

Spicy Chicken Sausage Pizza with Chipotle Pepper and Pepita Seed Pesto & Giveaway!

This giveaway is now closed.  Random.org chose #2

So, Mona…you are the winner!  I hope you enjoy your chicken sausages!!! You should be receiving an email soon!


A couple weeks ago I received an email from Gold’n Plump asking me if I’d be interested in trying their new line of chicken sausages.  I don’t typically buy Gold’n Plump products, so I didn’t really know anything about the company.  I was surprised to learn that they are based out of St. Cloud, Minnesota–just a few hours drive from where we live.

In fact, these chickens are probably more “local” than what I can get at my neighborhood butcher shop (sad, huh?)–and a whole lot cheaper than buying them straight from the farmer’s market/farmer.  Now, if you read my blog regularly, you’re probably already aware that I’m pretty picky when purchasing my meat.

I try to buy organic as much as possible, but sometimes that’s not always the practical thing to do.  Do you know how much money 12lbs of organic, cage-free, vegetarian fed chicken breast for a potluck would cost me?  A small fortune, I’m sure.  It’s the sad reality.

I replied to the email and asked a few questions about the chicken–what they’re fed, how they’re raised, and if they were given any hormones/antibiotics.   I was satisfied with the responses I was given, so I agreed to give the chicken sausages a try.

I was sent 4 different varieties to try:  Lean Chicken Bratwurst, Lean Hot Italian Chicken Sausage, Lean Parmesan Italian Chicken Sausage and Lean Apple Maple Chicken Breakfast Sausage.

I decided to try the Hot Italian Chicken Sausages first.

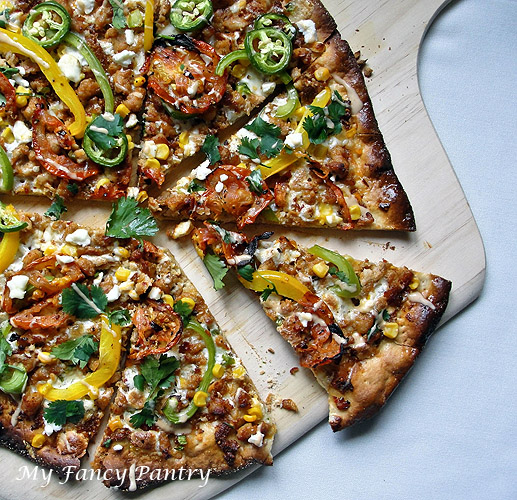
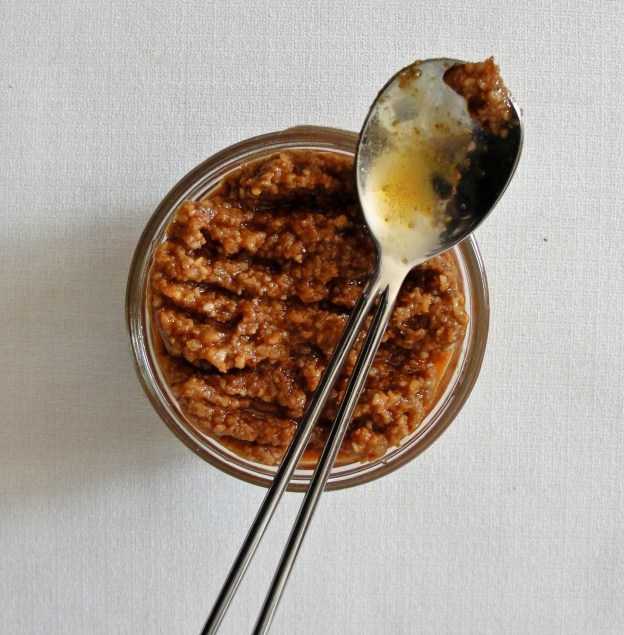
…And I had the perfect recipe in mind:  Spicy Chicken Sausage Pizza with a Chipotle Pepper-Pepita Seed Pesto.

Piyush always tells me how much he loves the chicken sausage pizza at Zpizza–a place he eats lunch at occasionally.  He’s actually bought chicken sausages from Trader Joe’s, Hyvee, Walmart and Sam’s Club–trying to find one with the same taste as the one on that pizza.  They all ended up in the garbage, and we continued to buy pork when we got the craving for sausages or brats.

Sure, pork sausage is delicious; but it’s also incredibly fatty–definitely not good for my already over-expanded waistline.  The spicy chicken sausage from Gold’n Plump contained 8 g. of fat and less than 180 calories per link.  That is a whole lot healthier than pork!  …and the apple maple breakfast sausages were 100 calories for 3 links–I say that’s awesome!  I can’t wait to give those a try this weekend.

Now, before I go on telling you what I think about the sausages, let me just state that yes, Gold’n Plump provided the sausages to me at no cost…but I will be honest, and all opinions/statements are completely my own.  

So, the nutrition stats look pretty good–aside from the sodium levels, but even that was less than most pork sausages I’ve bought in the past; and sausage is usually high in salt in the first place.  But how was the taste?

I removed the sausage from the casings so that I could top the pizza with ground meat instead of sliced.

In my personal opinion–and Piyush’s too–the hot Italian sausage was definitely as good as any pork sausage we’ve tried.  It was very well spiced (it actually is hot) and wasn’t dry at all.  After I removed the sausage from the casings (I wanted ground meat instead of sliced rings–although Piyush would have preferred I kept the sausages in the casings), I cooked it in a little olive oil until it browned up nicely.

Because Piyush loved the chicken sausage pizza from Zpizza, I thought it would be fun to make my own version.  I’ve never tried a slice before…so I went to their website and checked out the toppings.  It had chipotle pesto, red onions, corn, chicken sausage, mozzerella, tomatoes, cilantro and serrano chilies–it sounded fantastic!

I wish I would have thought of it first and could take all the credit, but no…instead I’m offering my version of Zpizza’s Santa Fe (which Piyush told me is nothing like their version—it’s different, but good on the exact same level.  He really loves their pizza).

Spicy Chicken Sausage Pizza

Not only am I excited to share this crazy-good pizza recipe with you all, but I’m also excited because the nice people at Gold’n Plump have offered to send one of my readers the exact same chicken sausage sampler pack I received!

Gold’n Plump’s New Chicken Sausage Line: Parmesan Italian, Hot Italian, and Apple Maple Breakfast Sausages. There was also a package of Chicken Bratwurst.

So lets talk about this Giveaway!

To enter, simply leave a comment telling me:

 What excites you about this new line of chicken sausages,  and what you would make with them if you won?

The giveaway ends Monday, June 4 at 7:00 p.m. Central Time.  The giveaway is only open to U.S. residents– (sorry!).  Be sure to include a valid email address with your comment…if you win, I’ve got to be able to contact you!

I’ll choose the winner randomly using Random.org’s random number generator.  If I don’t hear back from the winner by Wednesday, June 6 at 5:00 pm Central Time, a new winner will be chosen!

For an additional chances to win the Gold’n Plump Chicken Sausage Sampler Pack:

  • Like Gold’n Plump on Facebook (HERE)
  • Like My Fancy Pantry on Facebook (HERE)
  • Follow My Fancy Pantry on Twitter (HERE)
If you click LIKE on Facebook or FOLLOW on Twitter, be sure to leave a separate comment letting me know, and if you already LIKE or FOLLOW, leave a comment about that too!    

In the mean time, if you’d like to try these sausages, you can head over to Gold’n Plump’s website and grab a $1.00 off coupon!  They’re available at Super-Target (and some other stores too, I’m sure!).

Now, let’s get back to the pizza!

I used my basic whole wheat pizza crust recipe (using Indian Atta flour instead of regular whole wheat flour).

Printer Friendly Recipe: Pizza Crust

I topped the pizza with some Chipotle Pepper and Pepita Seed Pesto (recipe here) and finely chopped jalapeno peppers before topping with three kinds of cheeses: shredded mozzerella, shredded fontina and a locally made cheese similar to queso fresco.  I then added the chicken sausage (2 links), some thinly sliced green and yellow bell pepper, whole kernels of corn (I used canned–but rinsed it all well before using), roasted tomato slices and additional sliced jalapenos for my spice-loving husband.

I baked the pizza at a little higher temp than usual: 475 degrees F…and didn’t pay close attention, so you’ll notice I burned it a little.  I kind of liked it though, it reminded me a lot of a nice, wood-fired pizza–it even had that smokiness from the chipotles!

Once the pizza was finished baking, I topped it with some chopped cilantro, crumbled queso fresco style-cheese (the local stuff I used earlier) and an adobo-ranch sauce I made.  I don’t like ranch dressing, but I knew this pizza would be spicy so I thought some sort of sauce would help cool it a little and also add some additional flavor.

I mixed a few squirts of ranch dressing with a little bit of adobo sauce (which the chipotle peppers were packed in) until I thought it was well balanced.  I then tossed it in the fridge for a good 20 minutes, and drizzled it lightly over the pizza before I served it.

Piyush and I watched a netflix movie (some Hindi movie that I don’t remember the name of right now…) and enjoyed our pizza on the couch.

I’ve got to say, this might be the very best pizza flavor combination yet…

Chipotle Pepper and Pepita Seed Pesto

In order to make this:

spicy chicken sausage pizza with chipotle pepper and pepita seed pesto

I had to make this:

It’s no secret that I love pesto.  You could blend pretty much anything together and call it a pesto…and I’ll be in line to try it!

I wanted to make a spicy chicken sausage pizza with the new Gold’n Plump Hot Italian Chicken Sausages (which were delicious, by the way) that I received in the mail.

I was excited about the sausages because they are lower in calories and contain substantially less fat than regular pork sausage.  They’re nitrate free, dairy free and also gluten free!  Awesome!  Gold’n Plump is also a Minnesota company, and the chickens are raised on family farms just a few hours from where I live.   (More about these sausages later…along with a giveaway!)

I was aiming to recreate Zpizza’s Santa Fe pizza–it’s a spicy chicken sausage pizza that my husband absolutely loves.  I’ve never actually tried it, but he raves and raves about it every Monday, so I thought I’d check out the toppings online and figure out what makes this pizza so special.

Reading the ingredients, 2 words jumped out at me.  Chipotle Pesto.

I’ve never heard of such a thing, and I was curious.  I needed to make it, and I needed to make it now!    (Patience is not my strong point…).

I love a good challenge, so I started going through combinations in my head until I came up with what I thought would be the perfect recipe.

Not to toot my own horn or anything–but this pesto rocked!!!  🙂

I knew chipotle peppers and adobo sauce would be two key ingredients, and I figured I’d stick with the Parmesan cheese that you’d expect to find in a typical basil pesto.  I didn’t want to use pine nuts for two reasons.  One, they’re really expensive, and I didn’t want to use them in an experiment.  And Two, I didn’t know if the flavor would be what I was looking for.

I dug through my pantry…and there was my answer.  A big, unopened bag of Pepita Seeds (pumpkin seeds).

Pepita Seeds

Pepitas are the edible seeds inside the white hull of a pumpkin seed.  They’re a light green color, and have a mild pumpkin flavor.  They are commonly used in Mexican cuisine, so I figured they’d pair really well with the chipotle peppers.

If you’re unfamiliar with chipotles and have no idea where to find them, fear not!

Chipotle Peppers: what they lack in attractiveness, they make up for in flavor!

They’re simply smoked jalapeno peppers which are easily found in the Mexican isle of the super-market–usually packed in cans of adobo sauce.  They add a really wonderful smokey flavor to a dish–along with a little spice! (Be mindful when adding adobo to recipes, the sauce can be pretty spicy).

I grabbed a can of chipotle peppers in adobo sauce out of the pantry and separated the chilies from the sauce.  I rinsed 5 chilies under cold water–just to get the sauce off–and then split them to remove the seeds.  If you really love spice, you could definitely leave the seeds in, but I thought it might just be a little too much for me.

Removing the seeds from a chipotle pepper.

When I finished prepping the chipotle peppers, I added them–along with garlic, parmesan, pepitas, adobo sauce and my homemade chili-garlic olive oil (recipe) into a food processor.

I pulsed everything together until it was well blended and at the consistency I wanted (although a little more oil would have maybe been nice).

It was so different.  The taste was an exciting explosion of flavor on my tongue!  It was sweet, smokey, salty, spicy all at once!

My recipe made about a cup of pesto, so I put it in a few jars and tossed it in the fridge until I was ready to use it.  I’m not real sure how long it would last, as I’ve never made it before, but I’d say at least a week in the fridge–longer if you toss it in the freezer instead (freeze it in ice-cube trays, then it’s perfectly portioned too!).

I’m really excited to share my Spicy Sausage Pizza with Chipotle Pepper and Pepita Seed Pesto recipe with you, but if that doesn’t sound like something you’d enjoy, you could definitely slather some pesto on slices of toasted french bread and top with roasted tomatoes and crumbled queso fresco!  YUM!

Or you could make some pasta and toss it with the pesto and a variety of vegetables.  That sounds good too!

Or maybe even use it to make a really unique quesidilla!  I’m imagining toasted tortillas filled with a mixture of shredded mozzarella, queso fresco, sliced green chilies (or bell peppers if you don’t want more spice), and chicken!

The options are endless!

Stay tuned for my pizza recipe—it’ll be showing up on my blog shortly.  You’ll also want to check back because the nice folks at Gold’n Plump have also agreed to give a chicken sausage sampler pack to one lucky reader!  Their new line includes:

  • Chicken Bratwursts
  • Hot Italian Chicken Sausage
  • Parmesan Italian Chicken Sausage
  • Apple Maple Breakfast Chicken Sausage Links

Gold’n Plump’s new chicken sausage line

Chipotle Pepper and Pepita Seed Pesto

(makes approximately 1 cup finished pesto)

Ingredients:

  • 5 chipotle peppers- rinsed, seeded and roughly chopped
  • 5 garlic cloves- chopped
  • 3/4 c. Parmesan cheese- shredded
  • 1/2 c. pepitas- dry roasted
  • 1 tsp adobo sauce- or to taste (this can be spicy!)
  • 1/3c. to 1/2 c. chili-garlic olive oil (can substitute a different oil)
  • pepper/salt-to taste

Directions:

  • Place the parmesan cheese in the food processor.  Process until the cheese becomes a fine powder.  Then add the pepita seeds to the cheese and process again.  Pulse until the seeds are finely chopped–don’t process too long though–you don’t want the seeds to begin to turn into nut-butter.
  • Add the chopped garlic, chipotle chiles, and adobo sauce.  Process until everything is well combined and it begins to take the form of a traditional pesto.
  • Turn the food processor onto the lowest speed and drizzle the oil into the mixture (while everything is being processed).  Stop adding oil once the mixture reaches your desired consistency.
  • Season with salt and pepper, if needed.  Transfer pesto into jars and store in the refrigerator for up to one week, or in the freezer for up to 2 months.

printer friendly version

I love chipotles! 🙂

Caramelized Onion, Purple Potato and Pistachio Pizza

Lately, Friday night has become Pizza Night in our household.  …Vegetarian Pizza Night, to be more accurate.  I make the dough, sauces, and chop up all the toppings in the afternoon, let the dough rise for a few hours; and by the time Piyush and I are ready for dinner, all I have to do is toss it in the oven and wait for it to bake.

I tend to make mostly vegetarian pizzas (there are some exceptions) because I don’t believe Piyush and I need to eat meat every single day.  I also think vegetables are so vibrant and beautiful…meat would only ruin the beauty of the pizza.

This week, I got the idea to use pistachios on our pizza.  I thought the green would be pretty, and the flavor would be unique.

Continue reading

Chicken Tikka Masala Pizza!

One night while Piyush and I were touring around India, we decided not to go out for dinner. We were so tired, we turned on the tv and ordered room service. Because we were staying at a pretty expensive hotel…the food was also expensive.

Piyush couldn’t stand the idea that we were going to pay 3 times the amount for a meal that would cost us only a few rupees a couple blocks away. I understood what he was saying, but I didn’t want to leave the hotel again–and be forced to cross the road.

You see, crossing roads in India is scary!  There aren’t any cross-walks, and traffic doesn’t stop.  Piyush could easily handle it, but it made me crazy!  So crazy, in fact,  that I possibly had a mini tantrum, acted like I was 7 years old, and convinced Piyush to order room-service.  Possibly.

Watch this video, you’ll see.  It gives me a panic attack just seeing it!

To make up for my childish behavior, I told Piyush we could order the cheapest thing on the menu.  Imagine my excitement when that turned out to be pizza!

I mean, I love pizza.  I love curry.  What could be better than eating them both at the same time (haha I’m such a glutton!)?

Piyush didn’t want pizza and didn’t think it would taste any good, but I couldn’t resist: Chicken Tikka Masala Pizza.  It sounded amazing!  …And it was!  After eating a few slices, even Piyush said it was genius!

Unfortunately, I have not been able to find anything remotely close to that delicious pizza here in the United States.  Sure, you can order a chicken curry pizza once in awhile—but I haven’t tasted one I liked.

Since I made chicken tikka masala a few days ago, I decided to use the left-overs and attempt to replicate the pizza I had in India.  …and let me tell you, it was a success!

Just seeing pictures of it make my mouth water!  This pizza was incredible!!!  I wish there was some contest or something I could enter it into, cuz I’m tellin’ you…It would win!

This pizza could also be made vegetarian—simply do not include the chicken.  A paneer tikka masala pizza would be equally amazing!

Chicken Tikka Masala Pizza on Coriander-Garlic Whole Wheat Crust

Continue reading

The Perfect Health(ier) Pizza!

I haven’t blogged lately, and it’s not because we haven’t been cooking and eating at home.  In fact, I’ve cooked quite a bit.  We’ve had blackberry-ginger glazed salmon, chicken biryani (these will all appear on the blog, eventually!), and homemade pizzas.

I love Pizza.  There is just something so mouth-watering about dough smothered in tomato sauce and topped with gobs of cheese.  So mouth-watering…but so unhealthy!!!!  Therefore, I don’t  eat pizza, or “zah”—as I affectionately call it, very often anymore.  Piyush really dislikes pizza (blasphemous!), and much prefers his “pizza” on a crispy tortilla instead of a soft, chewy dough.

I decided to try and change his mind, to convert him into a pizza lovin’ maniac.  But, it would not be easy!  With the goal of creating a crispy—yet somewhat doughy (and possibly a little healthy)—crust, and a flavorful homemade sauce…I got to work.  I scoured the internet and found a couple dough recipes that had possibility.  I tried a few, but couldn’t find perfection.  So, I mashed them together—taking what I liked from some, and discarding what I hated from others.  Some would show promise, only in the end to puff up into a more bread-like crust.  That wasn’t going to work!

Eventually I combined recipes to come up with the perfect recipe, and the perfect technique.  I think both are really equally important…and you can get a totally different crust using the same recipe depending on how you prepare it.  I found that rolling the dough out with a rolling pin yielded the exact texture I was trying to achieve for the crust.  After it was rolled out I pricked it all over with a fork to keep the dough from bubbling up.  I sprayed it really quickly with olive oil, using my Misto (I love the Misto!).  Then, I pre-cooked the crust for a few minutes in a 450 F degree oven using a pizza stone—just to make sure it got ultra crispy.

Next step…the sauce.  I wanted something that had a fresh, rustic taste.  Something that was everything canned/jarred pizza sauce you find at the grocery store was not.  I don’t know how I did it, but I got the sauce right the very first time!  Piyush proclaimed it the best he’s ever tasted, and he said Italy would be proud.   (Haha—thanks, honey!…but I don’t know if I’d go that far!)

Aside from tasting really good, this sauce is also ultra easy!

fresh mozzarella, basil and mushroom pizza

After I had both the crust and the sauce figured out…I had to decide what to top it with.  I wasn’t really in a meat eating mood and I wanted to stick with something simple and flavorful.  We had lots of mushrooms in the fridge, and basil too.  I knew Piyush loves Mozzarella…and since I was trying to convince him that pizza is a food he should love…that decision was easy.  Mozzarella, it was! We bought a 8oz ball, and I used about half of it.  I thinly sliced the ball and then flattened those slices even more with my hands.  I dried them off with a paper towel (they were a little wet), cut them into halves, and slapped them on the the zah.

This pizza was simply delicious.  It was so easy, inexpensive, and flavorful.  And the best part….Piyush loved it!  In fact, he ate half of it!  I had two slices and it left me feeling full and satisfied.

easy homemade healthy pizza

Calorie-wise, each slice is equal to approximately 150 calories.  How awesome is that?!  I’m not sure how it tastes when it’s reheated yet…but I have a couple slices left for lunch tomorrow!  Yum!

Aside from the results…the other thing I love about both the crust and the sauce recipes are that they freeze up awesome!  If you keep a little dough and sauce in the freezer, making a pizza will be way faster than waiting for delivery (and just as easy, too)!

Whole Wheat Pizza Crust

(makes two 12″ crusts—8 slices/ea)

  • 1 1/2 c. all purpose flour
  • 1 c. whole wheat flour (plus more for kneading) I use Indian atta flour, for the best texture
  • 1/4 tsp. sea salt
  • 1 tbsp. olive oil
  • 1 c. warm water
  • 2 1/4 tsp. active, dry yeast
  • 1 tbsp. honey

Directions:

  • Combine the warm water, honey and yeast in a bowl.  Let this sit until it becomes foamy— about 10 minutes.
  • Meanwhile, in a large bowl combine the flours and salt.  Once the yeast mixture is foamy add it to the flours.  Stir, using a wooden spoon, until the dough begins to come together—then add the olive oil.
  • Knead everything together, adding additional flour (a little at a time) until the dough is moderately stiff and no longer wet.  Cover the bowl and let the dough rise for about a half hour.
  • Sprinkle a cutting board or parchment paper with some cornmeal.  Divide the dough into 2 portions (freeze one, if you’d like) and place one portion on the cornmeal covered surface.  Roll the dough out to a thin circle using a rolling pin.
  • Poke holes all over the crust using a fork.  Then, pre-bake the crust for 5 minutes in a 450 F degree oven (that has been preheated with a pizza stone for about 30 min).  Remove. Spread the crust with sauce and the toppings of your choice.
  • Bake at 450 F degrees (again, on the pizza stone) for about 10 minutes—or until the crust gets a little browned and the cheese gets all melty.

Easy Tomato Pizza Sauce

  • 3 or 4 large garlic cloves
  • 3 medium tomatoes
  • 1 tbsp olive oil, plus more for cooking garlic
  • 5 or 6 large basil leaves
  • salt and pepper—to taste
  • 1/2 tbsp sugar

Directions:

  • Peel, smash and chop garlic.  Add about 1 tsp. of oil into a pan and saute until garlic begins to turn a little brown (watch it closely—garlic burns easily!)
  • Put garlic, tomatoes (quartered), 1 tbsp olive oil and basil leaves in blender.  Blend until everything is combined, you can leave the tomatoes a little chunky if you want.
  • Pour sauce into the same pan you cooked the garlic in—add some chopped tomatoes if you’d like.  Add sugar and stir everything together.  Simmer on medium heat for about 30-40 minutes or until it thickens.
  • Season with salt and pepper.

So easy…and so perfect!!!

Also…How cute is this?!  It’s my cat wearing a mini scarf!  I’m starting to get the hang of this knitting thing…

Harry modeling his scarf