Tag Archives: Indian

Indian Spiced Hummus

I’ve never really been a huge fan of hummus.  In fact, I’ve bought it multiple times throughout the years, tried a tiny bit, and tossed the whole container in the garbage.  I wanted to like it, but I didn’t.   It just wasn’t my thing.

But, now it is!  

Once I made the commitment to myself to eat less meat (I still indulge once in awhile), I discovered just how good hummus could be.  It all started when I ordered a vegetarian pita wrap at our local Greek restaurant.

It looked like it was just a Greek salad stuffed in a pita; but once I bit into it, I tasted something smooth, nutty, and spectacular!

There was a giant glob of homemade hummus under that salad, and it tasted nothing like any hummus I’ve ever bought at the grocery store!  I was hooked.

I figured the only way I was going to get hummus that tasted like that was to make it myself.

I dug through all of my cookbooks, and finally found inspiration in “The Best Ever Vegetarian Cookbook” by Linda Fraser.  She had a recipe for Pan Fried Zucchini and Hummus.  It looked like such a weird combination, but it sounded amazing!

My version of zucchini with hummus

I didn’t follow her recipes at all.  I knew I wanted to make an Indian spiced hummus and zucchini with ghee, turmeric and cumin.  I read which ingredients she used to make hummus, and I got to work experimenting.

Hummus, in it’s most basic form, is simply made with garbanzo beans (chickpeas), tahini (sesame seed paste), lemon juice and olive oil.    Simple!

Because I wanted mine to be a little more than basic, I dry roasted a bunch of Indian spices in a pan and added in a little garlic towards the end of the roasting process (I think it makes the garlic taste a little more complex than just tossing in raw garlic).

I tossed the spices, along with the chickpeas, into the bowl of my food processor and blended everything until it was a smooth consistency.

I added the tahini, lemon juice and a little water to the mixture, and let it process again.  I tasted it; and added salt, black pepper and a little more lemon juice.  I tossed in some chopped coriander (cilantro).

I started the food processor back up (on low) and drizzled a little olive oil into the hummus–until it reached a perfectly smooth consistency.

Easy Spiced Hummus

For those that are interested, hummus has around 100 calories for a 2 tbsp. serving.

I garnished my hummus with some chopped cilantro, sliced red chilies (for Piyush) and a little bit of feta cheese.

I served it along with wedges of pita bread and zucchini.

Zucchini cooked in ghee, turmeric and cumin

The zucchini was really simple to prepare.  I put a little ghee (if you’re vegan, skip the ghee and increase the olive oil) mixed with a small amount of olive oil into a heavy-bottomed pan. I turned the flame to medium and tossed in a good teaspoon of cumin seeds.

Once the cumin began to pop and sizzle I added 1/2 tsp. ground turmeric and 1 tsp. ground cumin.  I also added a few curry leaves (these can be omitted).

Once the spices no longer smelled raw (this is especially important for turmeric, in my personal opinion), I added about 3 (maybe 4) cups of diced zucchini to the pot, along with a little water (maybe a couple tablespoons).

I let this cook, uncovered, on medium heat for about 15 minutes.  I then seasoned with a little salt and pepper.

Cooking zucchini this way is so easy, and so flavorful!  Because it’s now zucchini season here, in Minnesota, Piyush and I eat this quite a lot!  In fact, Piyush loves it mixed with a little potato and served over some basmati rice.

Sometimes, I’ll even cook some dal (lentils) with the rice, and serve a sort of “dried” khichadi (the ULTIMATE Indian comfort food).

My delicious dinner. Doesn’t look like a lot, but it was incredibly filling!

Meatless Monday: Indian Chole Masala (Chickpea Curry)

Happy “Meatless Monday!”

Indian Chole Masala

Chickpeas are one of my favorite ingredients.  There are so many things you can do with this humble (and cheap!) ingredient, that I always have a stash on hand.

As I’m still not feeling all that well, I’m going to keep this post short. Continue reading

Gulab Jamuns and Kala Jamuns: Indian Sweet Success!

Whoa! I haven’t blogged for over a week! I had quite a few posts started, but I just couldn’t find the motivation (or the time!) to complete them.

But really, if I’m being honest, it’s probably mostly because I just wanted a break from the computer…and the kitchen.

Indian Sweet Kala Jumun

If you’re a regular reader of my blog, then you may remember my first attempt to make gulab jamuns.  If you’re new to my blog, Namaste and thank you for visiting! You can read all about this tasty little sweet HERE.

Although gulab jamuns are quite tasty, kala jamuns are definitely far superior in taste (in my not-so humble opinion).  Kala jumuns are simply blackened gulab jamuns.  A scant teaspoon (more or less, depending on your recipe) of sugar is added to the dough.

When the dough balls are fried, the sugar begins to caramelize, creating a dark colored shell.

Frying the dough balls

After a few minutes…

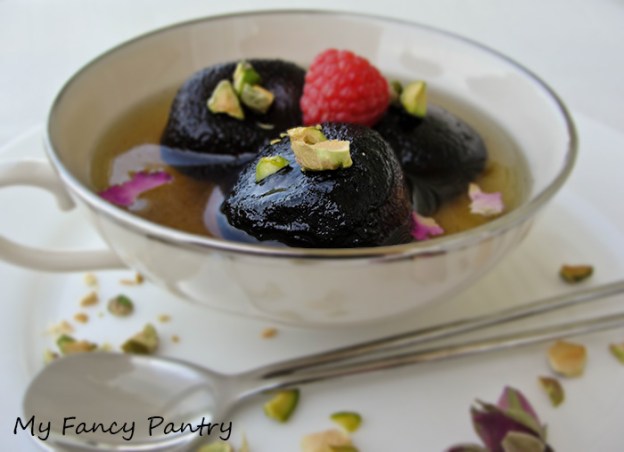
Kala Jamuns: Black Gulab Jamuns

I’m not really that good at frying things–remember when I melted the plastic spoon (what was I thinking?!) trying to deep fry samosas?–so some lessons I’ve learned when deep/shallow frying are:

  1.  Do not use plastic utensils.  This should be pretty self explanatory, but apparently it isn’t.  Either that, or I have no common sense.
  2. Don’t keep the heat turned to HIGH, you’ll end up burning your food–and yourself.
  3. Don’t put too many things in the oil at once.  The temperature will lower significantly and the food might be oily/mushy.
  4. Don’t use the wok.  I’m not sure why this didn’t work for me, because it seems like it’d be a great pan to fry stuff in.  But my oil got way too hot, way too fast…and wouldn’t cool down.  My food was burned on the outside and raw on the inside.  Maybe there’s some frying-with-a-wok secret that I’m not aware of?  Care to enlighten me?
  5. While frying stuff–especially things that cook relatively quickly–you’ve got to pay attention.  This isn’t the time to organize your spice cabinet, or unload the dishwasher.  Trust me.

Aside from frying the dough-balls, they also have to be rolled properly.  If your dough balls have cracks all over them, they will probably break apart in the oil.

They might also become hard in the centers…and no one enjoys hard gulab jamuns!  There are a few simple ways to avoid the cracking of your gulab jamun dough.

First, you’ll want to be sure the dough isn’t too dry.  You might need to add a little additional liquid–only a tiny bit at a time.  The ideal gulab jamun dough should be pretty soft, and not crumbly.  It also shouldn’t be sticky or overly wet.  You’re aiming to find a happy balance between wet and dry ingredients.

If your dough seems fine, then maybe you need to re-think your rolling technique.  What i do is pinch a piece of dough and roll a ball between my two hands.  The ball will usually have a few cracks.  Then, I simply flatten it in my hands and re-roll the ball.

The photo on the top is what my dough looked like after I just rolled it into a ball with my hands.  This is what that same piece of dough looked like after I flattened it and re-rolled it:

You can see it’s a pretty huge difference!

Now, since we’ve talked a little about technique, let’s get to the recipe!  This recipe is quite good–perfect, even.  It took quite a few trials, and a lot of failures;

FAIL! The dough was too wet and I used too much baking soda. The dough looked perfect, but as soon as it hit the oil it swelled huge…and then collapsed.  The oil also was not hot enough.

but I’ve finally figured out how to make this extremely popular Indian sweet at home!

After my first trial, I got quite a bit of feedback from blog readers (thank you!) and my in-laws.  In fact, Maa (my mother-in-law) was so determined to help me, she attempted to make a batch so she could give me some pointers (and a great recipe!).

Maa’s looked so pretty, so perfect;

Maa’s beautiful gulab jamuns

but sadly we don’t get fresh khoya (thickened milk “dough”) here in America.  And I definitely didn’t have time to sit over a stove and stir all day.  So I did a little searching and found a bunch of things I could use in replacement of the fresh khoya.

Luckily, I was able to find something called “mawa milk powder” at my local Indian market.  Mawa powder is probably the next best thing to actual fresh khoya.  It’s similar to milk powder–but it’s thicker.  It is basically a dried version of khoya (you can learn about the differences between regular milk powder and mawa powder HERE, if you’re interested).

So now that I had the mawa powder, I had to figure out how to turn it into khoya.  I did a lot of research online, and couldn’t really find a definite answer.  I found one recipe that said to use 2 cups mawa powder and 1 cup of liquid.  So I tried it.  I kept adding milk/mawa until I got the amount of khoya Maa told me I’d need.

The dough looked promising, but it just didn’t work.  The gulab jamuns fell apart in the oil and became quite flat.  After a lot of experimenting, I finally stumbled across the magic and mysterious ratio of mawa powder to liquid!

Kala Jamuns with a candied raspberry, pistachios and rose petals

The sugar syrup is quite easy.  Just toss 3 cups of sugar along with about 2 1/2 cups of water in a heavy bottomed pan over medium-high heat.  I added a few spices–cardamom and rosewater (I never really measure)–and let it cook for a good 20 minutes, until it thickened and became quite sticky.

When it’s the right consistency, remove from heat and cover with a lid to keep warm.

You can add cardamom, clove, cinnamon, maple syrup, lavender, rose water…the options are endless!  Just be sure to taste and add a little at a time so that the spices don’t become overwhelming  (especially important with cinnamon and rosewater!).

This makes quite a lot of syrup, more than you’ll ever eat with the gulab jamuns.  When the sweets are gone, I strain the syrup into a bottle and toss it in the fridge, labeled as “Gulab Jamun Syrup”.  It’s perfect on pancakes, in coffee, or to use in baking!

Gulab Jamun (Kala Jamun) Recipe:

Makes approximately 15 gulab jamuns–depending what size you make the dough balls

Ingredients:

  • 1 c. Mawa powder (available at Indian grocery stores, or online)
  • 1 tbsp. all purpose flour
  • 2 small pinches baking soda (approximately 1/8 tsp.)
  • 4 to 6 tbsp. half & half (start with 4, add more if needed)
  • spices- as desired (cardamom, clove, cinnamon…ect. Add whatever you like, just be sure not to add too much)
  • 1 tsp. sugar (only if making kala jamuns, leave out if making gulab jamuns).

Directions:

  • Heat a mixture of oil and ghee (I add about a tbsp. of ghee to whatever the amount of oil) in a heavy bottomed pan (I used a non-stick fry-pan).  You don’t need a ton of oil, maybe anywhere from 1/2 c. to 1 c. (this can be re-used a couple times).   Heat to approximately 300 degrees F.
  • While the oil is coming to temperature, toss all ingredients into a bowl and mix well.  Knead the mixture for a few minutes until it becomes smooth and soft.  Add additional liquid, as needed.
  • Roll the dough into crack-free balls, about the size of a large marble.  They will expand while cooking.
  • Once the oil comes to temperature, fry the dough balls in batches–about 4 at a time–until the outsides become brown or black (for kala jamuns) and the interior is cooked.  This should take about 4 minutes.  Be sure to flip the balls around so that all parts have equal color.
  • Remove from the oil and place on a paper towel for 30 seconds to a minute.  Toss into the syrup.
  • Let the gulab jamuns sit in the syrup for at least 20 minutes to an hour before serving–for best flavor!

Kala jamuns, unlike gulab jamuns, are not traditionally served in a bowl of sugar syrup.  Instead, they are usually left to soak the syrup, and then served “dry.”  But I say, do what you want! 🙂  Rules are made to be broken!

This recipe is absolutely perfect, and I think it’s the closest I could possibly get to recreating what I tasted in India!  Especially for the kala jamuns.  The outsides were sweet, black and oh so tasty!  The insides were moist and soft–not at all dry!

Piyush and I enjoyed these outside with a steaming glass of chai.  Indian sweets pair excellently with chai!

We also shared most of the sweets with friends and family (after all, I made about 5 batches…I was determined to make them perfect!), but they can also be frozen along with some syrup.

If you freeze them, pop them in the microwave for a minute–or so–to warm them up!

Chicken Chapli Kabab: Pakistani Style

We, Americans, eat a lot of burgers.  Hamburgers, turkey burgers, veggie burgers…they’re all an important part of our culture.   We love pretty much anything if it’s formed into a patty, placed on a bun, and slathered with toppings.  …and who can blame us?  Burgers are good!

We also love kababs.  Meat, veggies, fruit–it doesn’t matter.  If it’s been skewered or is served on a stick, we’ll eat it, and we’ll savor every last bite.

Now, things are really going to get interesting.  I’d like to introduce you all to the spicy, tender chapli kabab!

Chicken Chapli Kabab

It’s a kabab, but it’s not served on a stick.  It’s also a burger, yet it’s not on a bun.

The first time I tried traditional kababs, I’ve got to admit, I was confused.  They weren’t hunks of meat or vegetables threaded onto a skewer.  Heck, they weren’t even grilled!  Instead they were made of ground meat, studded with spices and little bits of vegetables.  They were tender, juicy, and quite unlike anything I’d had before.  I was hooked.

This version of kabab, the chapli kabab, is very popular in both Pakistan and Afghanistan.  They’re usually made with minced beef or lamb, but can also be made with chicken. The kababs get their name because of the way they’re shaped.  Piyush tried to convince me that they were called chapli kababs because they were flat like chappals (sandals), which is sort of true.

A pair of Piyush’s chappals

In actuality, they’re not named after the chappals, although it was a good guess.  They’re actually called chapli kababs simply because they’re flat.  The word chapli is derived from a Pashto (spoken in Pakistan and Afghanistan) word, chaprikh, also meaning flat.

Piyush and I first tasted the incredible chapli kababs at a Pakistani restaurant here, in Rochester.  The restaurant is called Kababs (if anyone is interested), and serves fabulous home-style food.  The food is very, very similar to authentic Indian dishes–especially dishes served in West Bengal (although the spices are a little milder, and the curries are definitely not as hot).  It’s cheap, and it’s good.

My chapli kababs were an even match, taste-wise, to what we ate at the restaurant.  The only difference is that I made mine a little thicker than they should be.

Pakistani-style Chapli Kabab topped with raw onion, tomato slice and mint/corriander chutney

I plan on making these again and again.  I can’t wait to grill these and serve them as alternatives to hamburgers at our next bbq.  Not only do they pack some incredible flavor, but they’re also pretty healthy.  Each kabab is around 140 calories, and it’s full of veggies.

I made the kababs using a pound of skinless, boneless chicken thighs.  I tossed the meat in my food processor and processed it until it was a smooth, paste-like consistency.  I then chopped a whole bunch of veggies: tomatoes, onion, green onion, serrano chilies, garlic, ginger, corriander…and tossed them all in with the meat.

I mixed everything really well, making sure to squeeze the juices from the tomatoes as I mixed–this helped keep the meat juicy and flavorful (I think…).  I added freshly ground corriander seeds (not ground to a powder), ground cumin seeds, dried pomegranate seeds, a little besan flour (chickpea) and even some crushed red pepper.  I seasoned the meat with salt and black pepper, and then formed into patties.

I used a pastry cutter to make the patties, mostly because I wanted them to be the same shape and size.  Also because I didn’t want to get my hands dirty after I had just washed them.  …What kind of cook am I?!

After the patties were formed, I tossed them in the freezer for about 15 minutes.  You don’t have to do this, I just find it helps hold the patties together a little better.  In fact, it seemed to work so well, I didn’t have a single patty fall apart on me.  Surprising, considering how much other stuff I had tossed in with the meat.

When I was ready to cook the patties, I put a little oil in a non-stick pan–just enough to coat the bottom.

If you’re trying to avoid oil, you could just use a non-stick cooking spray.  It should do a similar job, although you might not get that beautiful golden sear on the patties.

Chapli Kababs, ready to serve!

These patties were so juicy!  Chicken tends to get really dry, really fast; but I really think all the water from the veggies helped keep everything tender and moist.  This photo isn’t the best shot, but I think you can really see how juicy the kabab is.

Chicken Chapli Kababs (Pakistani Style)

Makes 9 medium-sized patties

Ingredients:
  • 1 lb. skinless and boneless chicken thighs (alternatively, you can use a combo of thigh/breast meat)- minced or ground in food processor
  • 1/2 medium white onion- diced
  • 2 roma tomatoes- diced
  • 2 large green onions- chopped
  • 3 serrano chilies (may use jalapenos)- seeded and chopped
  • handful corriander leaves (cilantro)- chopped
  • 1 tbsp. garlic paste
  • 1 tbsp. ginger paste
  • 1 tsp. corriander seeds – ground, but not into a powder*
  • 1 tsp. cumin seeds- ground, but not into a powder*
  • 1 dried red chile- ground to a powder (optional.  This will make the patties very spicy)*
  • 1 tsp. dried pomegranate seeds- ground*
  • 2 tsp. besan flour (chickpea flour–alternatively all-purpose flour would work too)- more if needed to hold the patties together
  • salt- to taste
  • pepper-to taste
  • oil- for frying (I think I used about 4 tbsp. total)
* Note: Any ingredient with a * after it could be substituted by using a pre-made chapli masala mix.  This mix may be hard to find, but many Pakistani grocers (and even some Indian grocers) will carry it.
Directions:
  • If your meat is not minced, grind it in a food processor until it is broken down and is paste-like in consistency.
  • Add all chopped veggies and spices to the meat, and mix together using your hands.  Squeeze the tomatoes as you mix everything together, releasing their juices.  Mix until everything is well combined.
  • Form the meat mixture into patties.  Either roll the meat into balls and flatten with your hands or use a burger press/mold.
  • Freeze patties on parchment paper for about 15 minutes.  They don’t need to be frozen through, just cold enough that the meat sticks together better.
  • Heat oil in a large non-stick pan over medium-high heat.  Once the oil gets hot, add the patties.  Cook in batches so they are not over-crowded in the pan.
  • Cook each side for about 2 or 3 minutes, until you notice a nice golden color on the outside.  Watch the sides of the patties, once they are no longer pink or raw, your kabab should be nearly done cooking.  Total time, about 5 minutes a patty.
  • Remove cooked patties from pan and lay on a plate lined with paper towels.  Serve immediately, garnished with corriander leaves, tomatoes, raw onion, and lemon wedges.  Serve the kababs along with chutney and rice or naan.  Enjoy!

And now, because I shared Piyush’s pretty chappals, I wanted to share some of my own Indian-style footwear! …I mean, what girl doesn’t love shoes?!

These were bought in Kolkata.  I love them, but have not worn them yet.  I’m putting it off because I know it’ll be painful (at first…).

These are my favorite, and were purchased in Amritsar, India–near Pakistan.

Yes, I really am that white. It’s sad, really. I wish I could tan…  I also have hideous feet.  They’re ugly, but they’re mine. 🙂

These shoes aren’t called chappals.  I can’t remember what they are called, actually.  They took about a month to break in (after struggling though some bad shoe bite!  They even made my feet swell HUGE), but are now my most comfortable pair of shoes.

…and since I was mentioning Pakistan, I thought I’d share a photo from the India Pakistan boarder.  This is as close as I got…You see that big white structure in the back of the photo?  That’s the entry to Pakistan.

It was incredible to see all the patriotism–from both India and Pakistan.  There were tons and tons of people, lots of dancing and music, and even a peace ceremony between both countries.  It’s something I feel blessed to have attended, and I hope to attend again (although we’ll get there earlier next time.  It fills up fast, and can be really hard to see anything).

If you’d like to see the ceremony, here is a video that explains it pretty good:

http://www.youtube.com/watch?v=YeSX6AZ5xEI

Aloo Gobi (Indian Spiced Potatoes and Cauliflower)

Since knowing Piyush and his family, I have eaten–and grown to love–foods I swore I didn’t like.  Foods I absolutely, positively hated.   Foods like: cucumbers, chilies,tomatoes (unless they were served in a bottle clearly marked HEINZ–I love ketchup) and the oh-so-dreaded cauliflower!

On the (very) rare occasions that my mom prepared this unpopular–at least in my household–white vegetable, it was either served raw with ranch dressing (I hate ranch!) or boiled until it turned to mush.  It smelled funny; and I didn’t like it.

I had completely banished cauliflower from my life.

That is, until I tasted aloo gobi.

Aloo Gobi: Indian Spiced Potatoes and Cauliflower

I don’t quite remember the first time I tried this dish, it was so long ago; but I can tell you that it changed my life.

It taught me that vegetables could–and do–have flavor.   This simple–yet complex– vegetarian dish also helped me to realize that vegetables don’t have to be mindlessly tossed on my plate alongside a giant hunk of chicken.

Instead, they can shine on their own; as a flavorful and filling meal.

Aloo Gobi is an easy, and very inexpensive, dish to make on a busy evening.  In it’s simplest form, it consists of potatoes, cauliflower and Indian spices.  But Indians are very innovative, so you’ll find that every part of the country–and practically every household–has their own version; sometimes adding tomatoes, peas, curry leaves, or even a few squeezes of lime juice.

This is my basic version, but feel free to make the recipe your own.  Add what you have on hand.  Do you have some forgotten carrots in the back of your fridge?  Are they sprouting little roots?  Peel them, and toss them in!  Personally, I think crushed peanuts would be a pleasant addition.  Anything goes!…well, almost.

Toss in some slit chilies!

Aloo Gobi ( Spiced Potato and Cauliflower)

Serves 4

This recipe will yield an incredibly delicious, but rather dry dish.  If you would like to make this dish more like a curry, add a little water and some chopped tomato (about 1 roma tomato would be just fine).  Aloo Gobi is delicious served with naan or rotis, and makes an excellent side dish!

Ingredients:
  • 1 small head of cauliflower (or 1/2 regular-sized)- cut into small pieces
  • 2 medium sized potatoes- peeled and diced
  • 2 tbsp. oil
  • 2 jalapenos- seeded and diced (leave the seeds in for extra heat)
  • thai or serano chilies- leave whole, but slice 2 or 3 slits in the chili (optional)
  • 1 tbsp. ginger paste
  • 1 tbsp. garlic paste
  • 1/2 tsp. black mustard seeds
  • 1/2 tsp. cumin seeds
  • 1/2 tsp. ground turmeric
  • 1 1/2 tsp. cumin powder
  • 1/2 tsp. garam masala
  • salt- to taste
  • black pepper- to taste
  • 1/4 corriander (cilantro)- chopped, extra to garnish
Directions:
  • Prepare all vegetables and keep them near.  Heat 2 tbsp. oil in a large pan over medium-high heat.  Add the mustard seeds and cumin seeds.
  • Once the seeds begin to pop and crackle, add the cauliflower, potatoes, chilies, ginger, garlic, turmeric, cumin and garam masala.  Stir everything to combine.
  • Continue to stir/fry for about 10-15 minutes, until the cauliflower and potatoes are cooked to your liking.
  • Once the vegetables are properly cooked, season with salt and pepper and add the chopped corriander.
  • Serve, garnished with additional chopped corriander.

Indian spiced potatoes and cauliflower: Aloo Gobi

Tonight, because Piyush wanted something more than just the aloo gobi, I served it with some vegetarian momos.  Momos are incredible, and if you haven’t tried them, you must!  You can learn more about them, and find my recipe HERE.

Aloo Gobi with Vegetarian Momos

And now, because I’ve been talking about vegetables, I thought I’d share a few shots of stuff from my garden.  This heat-wave we’re currently experiencing is causing my plants to struggle a little, but overall they’re doing pretty good.

…and I have to admit, no vegetable tastes better than one you’ve grown yourself.  I feel so excited when I pull something out of the dirt!  And so proud!  🙂

This shallot became an awesome raspberry vinaigrette! I’ll share the recipe soon!

Heirloom Amish Paste Tomatoes. This plant was almost dead, but it’s been coaxed back to life!

Basil! I have a giant basil plant as the centerpiece on my outdoor table. It’s thriving, and smells so good!

And because it really is amazing….

It deserves a close-up! 🙂

Home-Style Chicken Masala (Indian-Spiced Chicken Stew)

It’s no secret that I love Indian food.  Love may even be an understatement.  Truthfully, I am obsessed with the cuisine!

Sure, I enjoy the typical restaurant fare: chicken tikka masala, saag paneer, and even heaps of naan slathered with ghee (clarified butter).  Yes,  I admitted it.  I love ghee.  But, that’s not the point…(**quickly changes topic**)

What I’m trying to say is that the restaurant stuff is good, but it doesn’t even hold a candle to the rustic and inventive food served in the Indian home.  There is absolutely no comparison.

The curries my mother-in-law (Maa) and my father-in-law (Baba) create aren’t just food.  No way.  If you could just have one taste, you’d understand; these curries are love.

Home-Style Chicken Masala

Continue reading

Bengali-Inspired Raw Vegetable Salad

My days have been quite busy, and my nights have been so short; I feel like time just flies!  For this reason, I’ve not been blogging quite so much; and instead I’ve been relying on quick, easy and nutritious dinners.  Mostly vegetarian.

The other night I made this incredible salad:

It is very similar to something I had tasted–and fell madly in love with–all over West Bengal, India.  It’s so simple and healthy, but it’s also incredibly addictive.  Even more-so than chocolate.  Yes.  I said it.  This vegetable salad is more addictive than chocolate.

I swear, Bengalis sure can cook!

I raided my fridge and grabbed some cucumber, jalapenos, ginger, tomatoes (which apparently are not supposed to be kept in the fridge, but I do anyway…) and cilantro.  I opened a couple cans of chickpeas (garbanzo beans, also called chana), diced up an onion and juiced/zested a lime.  The salad was done.  It was that simple!

When I was served this salad in India, it usually contained boiled potatoes.  Sometimes there would be other vegetables too.  No matter the ingredients, it was always delicious! …and I always wanted more!

Because I wanted a really light dinner, I didn’t make anything else to accompany the vegetable salad.  Usually I’ll serve it alongside a spicy curry or roasted chicken.  Instead, I tossed a few blue corn chips (these are Food Should Taste Good brand chips, and they are amazing!) on the plate…and called it dinner.

This might just end up on my weekly menu rotation this summer.  It’s absolutely perfect when the weather is hot and the there’s not enough time to fuss over anything fancy.  …And it’s so healthy and colorful, how could you not want to eat it?

Printer Friendly Recipe


Food has been on my mind constantly, but not in the obvious “I’m hungry and I want to eat” sort of way.  Instead I’ve been busy picking fruits, making jam and desperately trying to keep my tomato plants alive (so far, so good!).

freshly picked strawberries: Annapolis variety

I’ve got a very awesome strawberry jam to share!  Hopefully I’ll get it all finished soon so I can get it posted!