I’m not a huge fan of seafood, but the other night while I was paging through one of my cookbooks (Gordon Ramsay’s Great Escape: India) I noticed a beautiful photo of a whole sea bass cooked in banana leaves. I haven’t been able to get it out of my mind since. It’s pretty much embedded.
I’ve had Mr. Ramsay’s cookbook for quite some time now, but have yet to cook anything out of it; so I was really excited to give this recipe a go. Unfortunately for me, buying a whole sea bass in Rochester is absolutely impossible. I can’t even have it ordered from our local grocery stores. Seriously.
Luckily, the man behind the fish counter was very knowledgeable and extremely helpful. He called his supplier to see what they could offer me. They had a few options, and he suggested I try the strawberry grouper. I ordered a couple fish and should be able to pick them up tomorrow.
Now that my dinner plans were officially and completely shot–yes, I am that dramatic–I decided to buy a pound of mussels and do something with those instead.

mussels: scrubbed and de-bearded
I brought my mussels home and sorted through them. Any mussels that will not stay closed when they’re pressed on should be tossed aside. They’re most likely dead. The photo below shows a mussel that has not yet been cooked, but refuses to keep it’s shell fastened shut.

Mussel won’t close before cooking? Throw that sucker out!
Once the mussels were sorted and scrubbed, it was time to de-beard ’em.

You see those nasty little string-like things poking out from the shell? That’s the mussel’s beard. I left this on until I was just about ready to toss them in my pot. Removing them too soon could–and probably will–cause your mussel to die.
The easiest way to remove the beard is to just grab it and pull quickly. I thought that some of the beards were really hard to remove, and patience is not something I’m known for, so I enlisted Piyush to help with this task. I also don’t like killing things–not even mussels–but I guess that’s another issue all together.
After the mussels were cleaned, I still didn’t know exactly what I was going to make. So I did what I always do when I don’t know what the heck I’m planning to make…
I diced an onion.

You’ve gotta start somewhere, right?
I looked in the fridge and found a green pepper, carrots and thai chilies. I grabbed a couple potatoes, some frozen peas and some peeled roma tomatoes. It was right then that I decided to make a mussel stew, similar to my bouillabaisse recipe.
I added some Indian spices and on a whim I decided to toss in some raw basmati rice. It was absolutely brilliant.
Modesty, like patience, is not something I possess in large quantities…

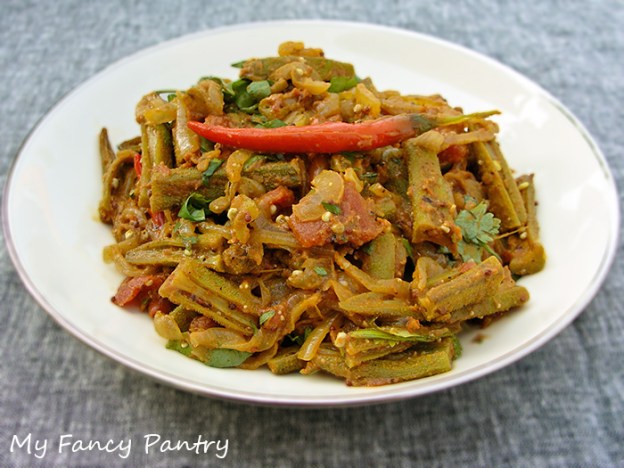
Indian Inspired Mussel Pilaf
The mussels had so much flavor and the rice was incredibly fragrant. Not only did this dish taste amazing, it was also relatively quick to make. The entire meal took approximately an hour from start to finish.

Indian Inspired Mussel Pilaf
Now, before I post this recipe, I have to say that it is not an authentic Indian preparation. It’s just inspired by my love of spice. 🙂
Serves 4
Ingredients:
- 1 lb. mussels– washed and de-bearded (see notes above)
- 2 tbsp. oil (I used a mix of olive oil/ghee)
- 1 large white onion- diced
- 5 garlic cloves- crushed and minced (add less if you don’t like garlic a lot)
- 1″ piece of fresh ginger- peeled, smashed and minced
- 1 tsp. black mustard seeds
- 4 thai chilies- slit (you may remove the membrane/seeds if you don’t like heat)
- 1 large green bell pepper- diced
- 2 medium potatoes- diced
- 2 carrots- diced
- 1/2 tsp. ground turmeric
- 1 1/2 tsp. garam masala
- 1 tsp. coriander powder
- 1 tsp. cumin powder
- 1 bay leaf
- 1″ small piece of cinnamon
- 4 green cardamom pods- slightly crushed
- 3 whole cloves
- 2/3 c. dry white wine*
- 14.5 oz. peeled roma tomatoes- diced (equivalent to 1 can store bought tomatoes)
- 1 c. frozen peas
- water- 1 c. to start
- pinch of saffron
- 1 c. basmati rice- rinsed
- salt- to taste
- pepper- to taste
- fresh coriander (cilantro)- 2 handfuls, chopped (one for recipe, one for garnish)
*If you do not wish to use wine, you can use water. No problem.
Directions:
- Heat oil in a large pot over medium-high heat. Add black mustard seeds. Once they start to sizzle, toss in the diced onion, green bell pepper, carrot, chili peppers and potatoes. Lower heat to medium, and sweat the vegetables until they become soft and tender.
- Add ginger and garlic. Also add the turmeric, garam masala, coriander powder, cumin powder, bay leaf, cinnamon, cardamom, cloves and 1 handful chopped coriander. Cook for one to two minutes or until the raw smell disappears. Things should start sticking to the bottom of the pan, and you’ll notice things will turn a little brown.
- De-glaze the pan with 2/3 cup of wine. Stir everything really well and let this simmer for a few minutes or until the wine doesn’t smell so strong. Add the tomatoes and cover the pan. Let this cook for about 10 minutes, or until the tomatoes break down.
- Add 1 c. water and a pinch of saffron. Cover and let this simmer another 3-5 minutes.
- Add the uncooked mussels to the tomato mixture and put the lid back on the pot. Let the mussels steam for 5 minutes, then remove the lid. Using a tongs, remove any mussels that have opened their shells and set them aside. If there are any unopened mussels, place the lid back on the pot and let them steam an additional 2 minutes. If they still do not open, they are most likely bad. Toss them out.
- Add 1 c. frozen peas.
- Season with salt and pepper.
- Add 1 c. raw basmati rice and an additional cup of water. Cover the pot and let the rice cook. After 10 minutes, check your rice. Add more water, if needed. The rice will take anywhere from 10-20 minutes to fully cook.
- Once the rice is properly cooked, check the seasoning and add salt and pepper if needed.
- Place the cooked mussels back into the pot of rice, place the lid back on the pot and turn off the heat. Let the dish sit, covered for at least 3 to 4 minutes so the mussels re-heat.
- Garnish with additional chopped coriander…and enjoy!
**NOTE** I leave the whole spices in my dish, but if you would like you can remove them. This can be difficult, but if you put all the whole spices in a little bag of cheesecloth before adding them to the pot it will make this task a lot easier.
I’ll get the printer-friendly recipe posted soon!

The only bad thing about this meal?
The lingering smell of the mussels. Now my house is going to smell fishy for about a week. Yuck.