Singaras —Bengali Style Samosa

If you enjoy Indian food on a regular (or even semi-regular) basis, you have probably heard of the samosa.  The samosa is to India what the “Hot Pocket” is to America…only it has a million times more flavor. And no cheese.  And includes vegetables.  Okay, it’s nothing like a Hot Pocket.  It’s better!  Way better.

Typically samosas are made with a combination of potatoes, peas and spices.  This stellar combination makes a pretty dry curry that is then stuffed into a cone-shaped piece of pastry, and formed into triangles.  The triangles are then fried and enjoyed with different chutneys or ketchups.  Even people that “don’t like Indian food” like samosas!

In Kolkata (and the majority of West Bengal) samosas are called singaras.  They use different spices

Spices for Singara: cumin, tumeric, garam masala, pachpuran, amchoor, hing

and usually include cauliflower, fried peanuts, and sometimes even a little coconut.  They are so tasty that I would officially proclaim them to be the king of all samosas!  Unfortunately I can’t get them here, and had no idea how to make them.

While we were visiting I requested singaras most days, and either Baba would pick them up on his way home from the office or Piyush and I would take a little walk to one of the sweet shops and buy some kalakand and fresh fried singaras.  We’d enjoy them before dinner, as a snack, while drinking tea and watching “Big Boss” (India’s version of Big Brother).  After craving them for months, and hearing my father-in-law talk about them every time we call India (I think he’s teasing me!), I finally I decided it was time to demystify the singara and figure out how to make it at home.

Because singaras are typically bought roadside instead of made at home, learning to make them while I was in India didn’t really cross my mind.  They are so cheap—less than 6 cents (American) a piece, that people just don’t bother making them.

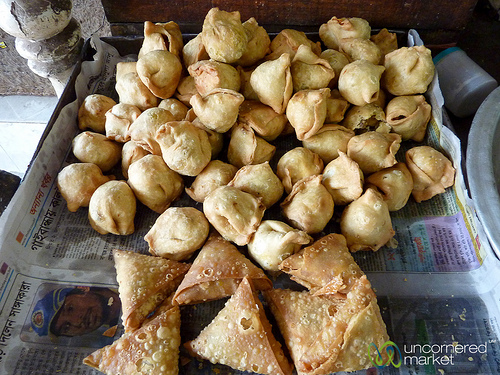
Singaras (back) and Samosas (front) as they are sold at a roadside stand. I couldn't find my photos, and this one is taken from Uncornered Market (click photo for direct link)

On our next trip, I am going to try and befriend a shopkeeper and see if they’ll teach me the trick to making the perfect singara.  Until that time comes, I’ll have to settle for my homemade version—which is pretty dang good, don’t get me wrong—it’s just not the same.

Singara and a Thums Up (can you tell I miss India?!)

My version of the Singara (a.k.a. the next best thing):

Dough:

  • 1 c. all purpose flour
  • 1/2 c. whole wheat flour
  • 1/2 tsp. ajwain seeds
  • 1 tbsp. oil
  • salt, to taste
  • water, enough to make a soft dough

Filling:

  • 1 large potato- peeled, cubed, and boiled
  • 1/2 cup (or so) of frozen peas
  • 1/2 c. cauliflower florets- cut very small
  • 2 tsp. ginger paste (or preferably fresh ginger)
  • 2 tbsp. peanuts- cut in pieces
  • 1 tbsp. coconut, diced fine
  • 1 tsp. sugar
  • 1 tsp. ground cumin
  • 1 tsp. pachpuran (Bengali five-spice mix)
  • 1 tsp. garam masala
  • 1 tsp. amchoor powder (dried mango powder)
  • 1 tsp. turmeric powder
  • 1/2 tsp. hing
  • 3 green chiles, or to your taste- diced finely
  • cilantro, to your taste
  • salt, to taste
  • oil, for frying

Directions:

  • Make the dough by mixing all the dry ingredients in a bowl and adding enough water to form a soft dough.  The dough should be a little sticky, but not too sticky.  It’s really hard to describe how a dough should be over the internet.  I think it’s something you need to have the feel of.  Once you’re happy with the texture of your dough,  cover it with a damp cloth and set it aside.
  • Start making the filling.  Add a little oil to a pan and fry the potatoes until they start browning.  Remove them from the pan and then add a little extra oil.  Fry the peanuts and the coconut.  Once they turn brown, remove them from the pan and drain them on a paper towel.
  • Using the same oil as you fried the peanuts and coconut in, cook the chile, ginger and spices for about a minute (or until everything becomes fragrant).  Add the peas and cauliflower.  Fry for about 3 minutes.  Then add the potatoes, cilantro, peanuts and coconut into the pan.  Cook this (adding a little water, if necessary) until the vegetables are tender.   Salt, to taste.  Set this aside and let it cool.
  • Separate the dough into 8 balls.  Roll out each ball, one at a time.  Once it is rolled out, cut it in half.

  • Brush the edges with a little water and form a cone with one of the halves, using your fingers.  Press the dough together lightly where it meets on the edges.  Fill the cone with the potato/cauliflower filling and then seal the singara by brushing a little water on one edge and pressing the whole thing together.

Singaras waiting to be fried

  • Fry the singaras in oil over medium heat until they are golden brown and delicious.
  • Serve with chutneys or ketchup…and wash it down with a warm cup of tea or a cold Thums Up

Indian version of Coca-Cola or Pepsi. I like it much better...it's less sweet.

P. S. Don’t use a plastic spoon in hot oil.

oops

P.P.S.  Thank you to Summer for teaching me how to deep fry.  I suck at frying.  Now, I suck a little less!  😀

Vegetarian Momos! …and Remembering Darjeeling

While on our trip to India, Piyush and I met tons of incredible people, visited many spectacular places and tried many different foods (well…different to me!).  I didn’t really think too much about it while I was there, but now that I’m back home in the states…I can’t get Darjeeling out of my head!

Darjeeling is a beautiful town located in the foothills of the Himalayas, very close to both Nepal and Tibet.  It’s a major tourist destination, and like most everywhere in India…it’s crowded!

A street in Darjeeling

Tibetian Monks in Darjeeling

One of many Darjeeling Tea Estates

Darjeeling is also quite famous for the fabulous tea grown all along the hills…and for the momos!

I only ate momos twice while we were on our little holiday, but gosh, they were so good that I wish I would have had them every day!  Oh, the things I take for granted…

Have you ever heard of momos?  No?  Probably not.  I know I hadn’t before our trip.  I don’t know if there are many places in the states where you can find sub-par momos— let alone the authentic, delicious momos.  The closest you might get is a potsticker or dim sum, which although very similar, are not momos.

So what exactly is a momo?

It’s quite simple, really.  A momo is basically a dumpling made with a flour/water based dough.  They are native to Nepal and Tibet, and are very popular in the North-Eastern part of India.  Inside the dough is a mixture of veggies, meats (optional) and aromatics. They can be steamed, fried and even boiled in soups.  It’s amazing how something so basic can be so versatile, so tasty…and so addicting!  After doing a little searching online, I found a couple recipes that looked promising.  I took a few things from each recipe and came up with something that tasted almost exactly like I remembered.

In fact…they turned out so good, Piyush ate 8 of them in less than 10 minutes—and then he licked the plate!

The only piece of criticism he gave me was that I made my momos larger than I should have. Mind you, there is nothing wrong with making them large, the taste is the same; but they’re meant to be more “bite-sized” than “hockey-puck-sized.”

formed momo, before steaming

My recipe will make approximately 30 large momos—you could probably get 45 or 50 if you make them a little smaller.  Out of curiousity I plugged my final recipe into a calorie calculator, and guess what?!  Each large sized momo is around 85 calories!!!  Awesome!!!

The dough is easy to make.

  • 3 c. all purpose flour
  • 1/2 tsp. salt
  • 1/2 tbsp. baking powder
  • water —enough to make an even, stiff dough.

Pour the flour, salt and baking powder in a bowl.  Add 1 cup of water to begin.  Don’t use a spoon to mix, use your hands!  Knead the dough, adding flour and water as necessary.  I probably ended up using 3 1/5 c. flour and around 1 1/2 cups water—-but this will vary!

Cover the dough and let it rest for around 30 min. (I managed to wait 20.  Patience is not something I possess…)

While the dough rests, make the filling.

  • 1 medium red onion, diced
  • 3 cups cabbage– finely shredded (I bought it in a bag, pre-shredded.  I hate shredding cabbage!  Hate it!)
  • 1 large carrot, grated
  • 1 1/2 tbsp fresh ginger, smashed and minced
  • 1 giant potato (or 2 medium)—made into around a cup of mashed potato
  • 1 1/2 tbsp chopped cilantro
  • 1 1/2 tsp salt
  • 1 tsp Kalaunji seeds (substitute cumin seeds, mustard seeds, or leave out all together)
  • 4 tbsp. extra virgin olive oil
Mix the onion, cabbage, carrot, ginger, cilantro, salt and mashed potato in a bowl.  Stir it until everything is combined.  Heat the olive oil on the stove-top and pour the kalaunji seeds in and once they start to pop, dump all the oil/seeds in the veggie mixture.  Stir everything until mixed together, and set aside.
Next, take the dough and pinch off little balls—about 1 tbsp.  Roll the balls out into a some-what circular shape.

Roll the dough out (make them smaller if you're making bite-sized momos)

Pick the dough up in your left hand and plop a good heaping tablespoon of filling in the center.

Next, start crimping the edges and form the momo into  a circular shape.

crimp and pinch the dough around the filling

Ready to be steamed!

***Make sure you keep a damp towel over the momos and the dough as you’re forming them.  You don’t want the dough to dry out. ***

Once you get the momos all formed, you can either steam them right away or you can freeze them.  I froze all of mine because I wasn’t sure when Piyush would be home to eat them.  I placed them on a parchment paper lined baking sheet, popped them in the freezer and let them stay there a couple hours.  Once they were fully frozen I put them into a giant ziplock bag, and back in the freezer.

When you’re ready to steam them:

Put water in a steamer pot and bring to a boil.  Place the steaming basket(s) in the pot.  If the water touches the basket, pour a little out.

Once the basket is in the pot, spray it with a little cooking oil (I used my misto)—you don’t want the momos to stick!  Work in batches, and place momos in the basket in a single layer so they don’t quite touch.

Set the timer for 15 minutes and don’t take the lid off the pot until it buzzes.  Resist the temptation.  Once the timer goes off, take them out of the steamer and serve with some soy dipping sauce, chile sauce, or tomato chutney!

Enjoy a little bit of Darjeeling, half a world away!

Have you ever visited some place that was so amazing, it left you wishing you could go back?  I have heard quite a few people who have been to Darjeeling say that they would love to retire there.  I can totally understand!

Enjoy a couple more photos!

Baba enjoying some Darjeeling tea

Wild Mushroom and Marjoram Chicken

I started my morning off with a trip to the dentist.   It’s not the most pleasant way to begin the day and truthfully I had no idea that I even had an appointment.  There was some sort of a mix up at the office—they thought Piyush had an appointment at 7am, so they called to remind him about it.  He said he didn’t make the appointment, so they thought maybe it was me.  They called me and I had no idea that I made an appointment either (especially at 7!  on my day off!).   Since I was free for the day, they convinced me to go in and get my pearly whites cleaned and checked out.  Unfortunately, Dr. Watkins gave me some bad news…

This princess is getting a new crown!  I’ve never had a crown before—actually I’ve never really had any dental work, aside from some cavities filled.  Sadly it’s because of one of those cavities (mostly the really bad job my prior dentist did filling it) that I now need this crown.  Ok, and it might also be that I drank too much soda as a kid…and too much hard liquor as a college student, but there’s nothing I can do to change that now.  The damage has been done, my friends.

I was out of the dentist’s office in about an hour, and since I was already awake—and functioning—I decided I might as well check out the thrift store and see if I could find anything neat.  Today was a bust.  I didn’t find anything super exciting, but I did get a new book to read, a shirt for Piyush, some canning jars, a terra cotta garlic roaster and a cake platter.  Total spent?  Around 10 bucks.

There was a big dresser that matched the one I bought for my entry way, it was obviously from the same set.  I thought it’d make an awesome buffet for our dining room (with a little elbow grease and repurposing), but the price tag said $50.  That’s about 30 dollars too much, in my opinion.  So I passed.

When I got bored of thifting, I grabbed a few groceries and headed home to a sink full of dirty dishes.  At home, I was quickly reminded that it was winter and I needed to put on boots and stop wearing my totally awesome crocs:

click photo to go to the crocs website

Seriously, I never thought I’d be a croc kind of girl…but I love these shoes!  They’re slide ons—so they’re quick.  They’re durable, comfy and rubber (or something like that…I don’t really know what they’re made from, actually).  I hate wet feet, so these do a good job of keeping them dry.   I wore them everyday in India—even when we were climbing the steep hills of Darjeeling (I have really high arches and walk more on the sides of my feet. Even without my custom insoles these shoes give me no pain.)  Basically, I love this shoe.  But sadly, they have no traction…and are terrible on ice!  Lucky for me, I am a very graceful faller.  Like, really graceful.  You should have seen it.  I slipped on the ice, went into a perfect lunge—didn’t even crack my knee on the ground—and slid back up, all in one motion.  It was like some sort of weird ice ballet.  I bet it looked awesome.

After shimmying my way down to the mailbox, trying to avoid the ice…and back up to the house, I decided to make Piyush a nice dinner.  I had some chicken breasts, so I knew that was going to be the base.

I eventually settled on seasoning the chicken breasts with marjoram, making a simple pan sauce and serving it all with mushrooms and roasted purple potatoes.  I was worried he wouldn’t like it.  But it turned out really delicious and he scarfed it down…no complaints.  He even told me the recipe was a “keeper.”  Yay.

Marjoram Chicken Breast with Mushrooms and Roasted Purple Potatoes

The purple potatoes were amazing!  I’ve never had them before so I had to try them out.  They taste really similar to red potatoes…but they’re such a beautiful color!

I cut them in half (or quarters, if they were big), drizzed them with some olive oil, seasoned with salt/pepper, added some chopped rosemary and smashed garlic and then roasted in the oven at 400 degrees F for 20 minutes.  Simple.  Easy. Fast.

While they roasted away, I got to work on the chicken.

Marjoram Chicken with Mushrooms and Marsala Pan Sauce

(recipe inspired by Bon Appetit)

  • 4  skinless boneless chicken breast halves
  • 6 teaspoons dried marjoram (use fresh if you have it!), divided
  • 1 tsp. fresh rosemary, chopped
  • 2 tablespoons butter, divided
  • 1 tablespoon olive oil, divided
  • 10 ounces assorted wild mushrooms (I bought a frozen bag at the co-op…and they were awesome!)
  • 4 shallots, diced
  • 3/4 cup low-salt chicken broth (make your own!)
  • 1/4 cup half and half
  • 1 tsp. flour
  • 3 tablespoons dry Marsala
  • Salt/Pepper

Directions:

Season chicken breasts with salt and pepper, then 2 teaspoons marjoram (I didn’t really measure—just sprinkled liberally).

Melt 1 tablespoon butter with 1/2 tablespoon oil in large nonstick skillet over medium-high heat. Add chicken to skillet and sauté until just cooked through. Transfer chicken to plate; tent with foil to keep warm.

Melt remaining 1 tablespoon butter with1/2 tablespoon oil in same skillet. Add mushrooms, shallots, and 2 teaspoons marjoram. Sauté until mushrooms are brown and tender, about 6 minutes. Season to taste with salt and pepper. Transfer to bowl.

Combine broth, cream, Marsala, rosemary and remaining 2 teaspoons marjoram in same skillet; boil until thickened and reduced to 1/2 cup, about 5 minutes. Season sauce with salt and pepper.

Divide mushrooms among 4 plates. Top mushrooms with chicken. Spoon sauce over and serve.

This meal came in at around 650 calories for my portion (pictured above).  It’s not something I’d eat all that often, because it’s so rich.  But it’s definitely something I’ll make again!  It had a lot of flavors and they all worked extremely well with one another.  The original recipe didn’t call for rosemary but I thought it’d be a good addition…and I was right!

If you’re looking to impress someone (Valentine’s Day is around the corner….I’m just sayin’), this will do it.  This meal is seriously restaurant quality…and I’m not talking “Olive Garden” or “Applebees” kind of restaurants.  This tasted like something I’d expect from a really fancy place.  It was that good!

Now that I have a full belly, Teen Mom is over, and my face has been cleansed…it’s off to bed!  I have a long day tomorrow!

The Perfect Health(ier) Pizza!

I haven’t blogged lately, and it’s not because we haven’t been cooking and eating at home.  In fact, I’ve cooked quite a bit.  We’ve had blackberry-ginger glazed salmon, chicken biryani (these will all appear on the blog, eventually!), and homemade pizzas.

I love Pizza.  There is just something so mouth-watering about dough smothered in tomato sauce and topped with gobs of cheese.  So mouth-watering…but so unhealthy!!!!  Therefore, I don’t  eat pizza, or “zah”—as I affectionately call it, very often anymore.  Piyush really dislikes pizza (blasphemous!), and much prefers his “pizza” on a crispy tortilla instead of a soft, chewy dough.

I decided to try and change his mind, to convert him into a pizza lovin’ maniac.  But, it would not be easy!  With the goal of creating a crispy—yet somewhat doughy (and possibly a little healthy)—crust, and a flavorful homemade sauce…I got to work.  I scoured the internet and found a couple dough recipes that had possibility.  I tried a few, but couldn’t find perfection.  So, I mashed them together—taking what I liked from some, and discarding what I hated from others.  Some would show promise, only in the end to puff up into a more bread-like crust.  That wasn’t going to work!

Eventually I combined recipes to come up with the perfect recipe, and the perfect technique.  I think both are really equally important…and you can get a totally different crust using the same recipe depending on how you prepare it.  I found that rolling the dough out with a rolling pin yielded the exact texture I was trying to achieve for the crust.  After it was rolled out I pricked it all over with a fork to keep the dough from bubbling up.  I sprayed it really quickly with olive oil, using my Misto (I love the Misto!).  Then, I pre-cooked the crust for a few minutes in a 450 F degree oven using a pizza stone—just to make sure it got ultra crispy.

Next step…the sauce.  I wanted something that had a fresh, rustic taste.  Something that was everything canned/jarred pizza sauce you find at the grocery store was not.  I don’t know how I did it, but I got the sauce right the very first time!  Piyush proclaimed it the best he’s ever tasted, and he said Italy would be proud.   (Haha—thanks, honey!…but I don’t know if I’d go that far!)

Aside from tasting really good, this sauce is also ultra easy!

fresh mozzarella, basil and mushroom pizza

After I had both the crust and the sauce figured out…I had to decide what to top it with.  I wasn’t really in a meat eating mood and I wanted to stick with something simple and flavorful.  We had lots of mushrooms in the fridge, and basil too.  I knew Piyush loves Mozzarella…and since I was trying to convince him that pizza is a food he should love…that decision was easy.  Mozzarella, it was! We bought a 8oz ball, and I used about half of it.  I thinly sliced the ball and then flattened those slices even more with my hands.  I dried them off with a paper towel (they were a little wet), cut them into halves, and slapped them on the the zah.

This pizza was simply delicious.  It was so easy, inexpensive, and flavorful.  And the best part….Piyush loved it!  In fact, he ate half of it!  I had two slices and it left me feeling full and satisfied.

easy homemade healthy pizza

Calorie-wise, each slice is equal to approximately 150 calories.  How awesome is that?!  I’m not sure how it tastes when it’s reheated yet…but I have a couple slices left for lunch tomorrow!  Yum!

Aside from the results…the other thing I love about both the crust and the sauce recipes are that they freeze up awesome!  If you keep a little dough and sauce in the freezer, making a pizza will be way faster than waiting for delivery (and just as easy, too)!

Whole Wheat Pizza Crust

(makes two 12″ crusts—8 slices/ea)

  • 1 1/2 c. all purpose flour
  • 1 c. whole wheat flour (plus more for kneading) I use Indian atta flour, for the best texture
  • 1/4 tsp. sea salt
  • 1 tbsp. olive oil
  • 1 c. warm water
  • 2 1/4 tsp. active, dry yeast
  • 1 tbsp. honey

Directions:

  • Combine the warm water, honey and yeast in a bowl.  Let this sit until it becomes foamy— about 10 minutes.
  • Meanwhile, in a large bowl combine the flours and salt.  Once the yeast mixture is foamy add it to the flours.  Stir, using a wooden spoon, until the dough begins to come together—then add the olive oil.
  • Knead everything together, adding additional flour (a little at a time) until the dough is moderately stiff and no longer wet.  Cover the bowl and let the dough rise for about a half hour.
  • Sprinkle a cutting board or parchment paper with some cornmeal.  Divide the dough into 2 portions (freeze one, if you’d like) and place one portion on the cornmeal covered surface.  Roll the dough out to a thin circle using a rolling pin.
  • Poke holes all over the crust using a fork.  Then, pre-bake the crust for 5 minutes in a 450 F degree oven (that has been preheated with a pizza stone for about 30 min).  Remove. Spread the crust with sauce and the toppings of your choice.
  • Bake at 450 F degrees (again, on the pizza stone) for about 10 minutes—or until the crust gets a little browned and the cheese gets all melty.

Easy Tomato Pizza Sauce

  • 3 or 4 large garlic cloves
  • 3 medium tomatoes
  • 1 tbsp olive oil, plus more for cooking garlic
  • 5 or 6 large basil leaves
  • salt and pepper—to taste
  • 1/2 tbsp sugar

Directions:

  • Peel, smash and chop garlic.  Add about 1 tsp. of oil into a pan and saute until garlic begins to turn a little brown (watch it closely—garlic burns easily!)
  • Put garlic, tomatoes (quartered), 1 tbsp olive oil and basil leaves in blender.  Blend until everything is combined, you can leave the tomatoes a little chunky if you want.
  • Pour sauce into the same pan you cooked the garlic in—add some chopped tomatoes if you’d like.  Add sugar and stir everything together.  Simmer on medium heat for about 30-40 minutes or until it thickens.
  • Season with salt and pepper.

So easy…and so perfect!!!

Also…How cute is this?!  It’s my cat wearing a mini scarf!  I’m starting to get the hang of this knitting thing…

Harry modeling his scarf

Monday Madness! and a Greek Inspired Dinner

I really enjoy Mondays.  Though, I haven’t always.   In fact I used to spend Tuesday-Sunday dreading the upcoming Monday.  Extreme?  Probably; but when I was young(er) with few(er) worries and responsiblies, Monday meant that the weekend was ending…and work/school was starting.  Mondays were an unpleasant jolt back to reality, and I hated them for that.  Now, I work every other weekend.  And sometimes Monday signifies the end of my week, not the beginning.  Monday is the new Friday.  Sort of.

Mondays also mean I’m obligated to go to the gym.  I need routine and consistency.  I also need to feel accountable, and the only thing I’ve found that works is to sign up for a program where I know people are expecting me.  For some weird reason I feel worse letting down complete strangers than I do letting myself down.  How screwy is that?! So, Monday night has become Cable Class night.  And I look forward to it!

I really like all the trainers at the gym, but I’ve got to say I’m partial to either Paula or Angie.  I feel that they know my limits and know how to push me.  They also know when I’m being lazy, and that’s important…If they have all this faith that I can do something, maybe I really can.  And that’s usually how it works.

Tonight’s cable class was extra hard, probably for a few reasons.  The first being that I haven’t really worked out since returning from India—call it an extended holiday, if you will.  Secondly, I decided to wake up this morning and take a yoga class.  My arms were on fire!  Now, they are jello.  …But I feel good.  Like, real good!

After the gym I came home and heated up dinner.  Because my class is at 7:45 pm and I don’t really want to work out on a full stomach, I usually put together a meal and have it all ready to heat up when Piyush and I get home around 9.  I know 9 seems like a really late time to eat a big dinner, but it’s what works for us…so we do it.

Tonight we had Greek!  We love Greek food and tend to order take out way more than we should!  I decided it was probably time to make something healthy that had those same flavors, and today was as good of a day as any other.  This dinner was really simple and honestly there aren’t really any “real” recipes.


Basically it’s brown rice with a little lemon juice and greek seasoning, grilled and seasoned chicken, and steamed summer squash/zucchini.  I also smothered it in tzatziki sauce!

I wish I could say I made the sauce, but I had a container of tzatziki left from the restaurant here in town.  It’s a yummy yogurt based sauce that makes a great dip for celery sticks, so I always try to have some on hand.  It’s really easy to make too…and next time I actually make my own I’ll definitely share the recipe!

But now I have to sleep!  I have to work early tomorrow.

Tuesdays….sigh.  The only good thing about Tuesday is “Teen Mom!”  Hah!

Oh!  Before I go, I also have to just say that I am so proud of my little sister!!!  She had an interview today at the Mayo Clinic School of Med….and I couldn’t be more excited for her!!!!!  There are only 2 more spots open…and 12 more to interview, but I know she’ll get accepted!  They’d be goofy not to accept her!  She looked just like a little doctor, all dressed up in her suit and pearls.  Yay!, Michelle!

Vegetarian Bean Taco Salad

I must be in a Mexican kinda mood, because it seems that’s all I feel like cooking lately!  I’ve also felt like eating beans.  Lots of beans.

source (you can also click this link to learn about the health benefit of beans)

When I was planning dinner the other day, I decided I’d make a vegetarian taco salad for three reasons:

1. Tacos are delicious.

2. Salads are good for you.

3. I can eat the bowl I serve my salad in.  Now, that’s exciting!

I decided to get a little head start on my taco filling.  Not that it takes a long time or anything- in fact, it takes hardly any time!- but mostly because I didn’t want to do it later.  My theory when it comes to dinner preparation is the sooner the better.  The longer I put it off, the lazier I become.

Before I started turning regular cans of black and pinto beans into delicious, taco-flavored delicacies, I chopped up some veggies and had myself a little snack.

I made a simple Indian inspired salad (I’ve blogged about it here), and added a tablespoon or so of aloo bhujia—fried, spiced potato noodles—for a little crunch.  I think the weather outside has me craving Summer.  It seems like spring and was even 50 degrees today!  This salad screams Summer, but sadly the tomatoes and cucumber screamed “out of season”! …Back to reality.  I still have over 5 months before Summer arrives!

After eating my snack, I decided to get started on my tortilla bowls.  When I lived with my grandparents, after moving home from college, this was a meal I often made for dinner.  It all started when I was at the supermarket and had a mad craving for a taco salad.  I picked up some ground turkey, grabbed the lettuce and veggies and I found the pre-made taco shell bowls.  I flipped over the package, and realized that one bowl was nearly 500 calories!  Whoa!  Then I got to thinking (I know, right!?!)…A taco shell bowl is really just a tortilla!  So I went home and draped torillas over glass pyrex bowls and baked them at 400 degrees, until they were crisp.  Genius!  I used whole wheat, low calorie tortillas and was able to knock the calories of my taco shell bowl down to a measly 80 cals.  Awesome!  Now, I have a couple fancy taco shell bowl molds.  They make awesome bowls, but they’re really completely unnecessary.

After my bowls were baked, I started on the bean mixture.  I used a combination of pinto and black beans because I really love the creaminess of smashed pinto beans.  Weird?  Probably. Delicious? Oh.My.God.YES! I heated them through, had a fun time smashing them, and then set them aside.

Then all I had to do was chop the romaine and assemble.  Easy!

It's a taco! It's a salad! It's a taco salad!

Bean Taco Filling

  • 2 tsp. olive oil (you don’t need much)
  • 2 cans of beans (any kind), rinsed (alternatively you could use dried beans.  3 cups total.
  • 1 small red onion
  • 3 fat garlic cloves
  • 1/2 c. green bell pepper
  • 1 serrano chile
  • 1 package low-sodium taco seasoning (or make your own!)
  • 1 1/2 c. water
  • lime juice, to your taste
  • salt, to your taste (you probably don’t need any with the canned beans and taco seasoning, though)

Directions:

  • Heat your pan over medium heat and add the olive oil.  Once the pan is hot, saute the onion, chile and green pepper until they’re all soft and cooked through.
  • Add garlic and saute about a minute, then add the taco seasoning (or spices, if you make your own) Cook for about a minute until the spices are no longer raw.
  • Add the beans and the water.  Once it starts to boil, smash as many of the beans as you’d like.
  • Cook until water disappears and the mixture thickens.  Squeeze in a little lime juice, and give it a good stir.

I topped my salad with about 1/2 c. bean mixture, some of my Indian salad, a tiny bit of cheese, and a dollop of greek yogurt.

All healthy meals should be this good!

It’s Clemen-time!

You know what I love about winter?  It’s not the snow or the cold (actually, I hate both of those things).  It’s not even the holidays.  Nope.  What I love most about winter is the clementines!

Look at this guy:

One bite…and I was in love.  It didn’t stand a chance.  The only problem?  (aside from the price $$$) I don’t have nearly enough to last the week!  I love clementines and we try to keep them on hand—they’re the perfect snack.  I bought these guys from the co-op, and they rock my world!  They are a million times more scrumptious than the “cutie” ones we usually buy from the grocery store.

I feel so lucky to have the opportunity to shop at our local co-op, The Good Food Store.  You can find practically anything there!  It kind of reminds me of whole foods, actually—it’s just smaller, filled with local produce, and the people are so much more friendly.  All good things!

I had a few items I wanted to pick up including romaine, herbs, beans, salsa and some cheese.  I’ve got bean taco salads and a pasta dish on the menu for this week, and I’m hoping that a little extra planning will really make dinner preparations seem a lot less tedious.

Since I was out and about, I figured I might as well make a quick stop at Goodwill.  Deals wait for no-one, you know! (haha!)

I want to find a tiny desk for our laptop, but had no luck today.  Instead, I did find an amazing, little serving dish for $3 that will be awesome for chutneys or salsas!

How cute is that?!

After I finished up at Goodwill, I stopped in at Michaels to get some knitting supplies.  I’ve always wanted to learn to knit and never really knew how to make that happen.  I thought about taking classes, but with my work schedule it’s not that easy to commit.  I don’t have a set schedule and it’s hard to get certain days off in during the week.  So, I decided I’d buy some needles and yarn and check out youtube.

It's not much...but it's a start.

Aside from knitting, I’m also doing a little “gardening”…I have green onions growing on top of my refrigerator!

I just threw some old roots in a jar…and wham!  I’ve got onions!

Does anyone know if I can grow other herbs this way?  I don’t think they get the greatest sunlight, but they really seem to be thriving!

Now, it’s Greek for dinner (we got some take out from a local restaurant we haven’t tried before), then some mind numbing television (Teen Mom)  before I shower and head to bed!

Happy Tuesday, everyone!!!